Introduction
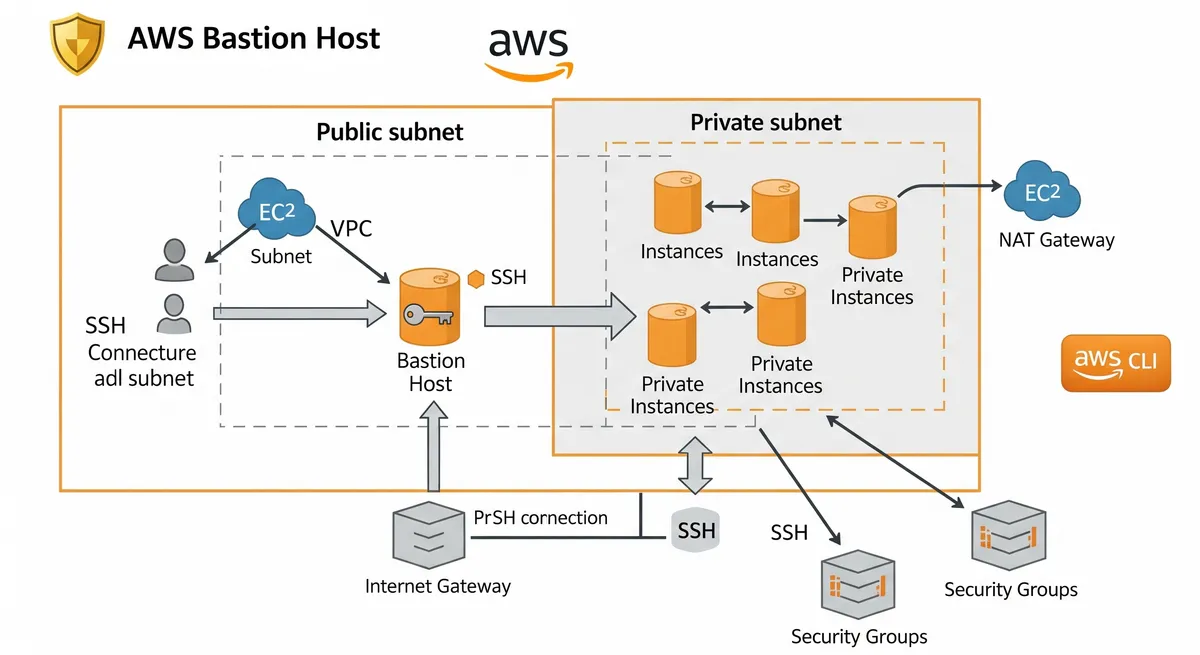
In today’s world, security is the top priority for any infrastructure and applications, that’s why a Bastion host is a must-have in your infrastructure if you want to secure your remote connections. A Bastion host is a special-purpose computer on a network specifically designed and configured to withstand attacks. In this post, we will show you how to set up a Bastion host on AWS using the AWS CLI. We will create a Virtual Private Cloud (VPC) and subnets, create an Internet Gateway and configure the Bastion host with the appropriate permissions to access our EC2 instances. By the end of this post, you will have a secure and easy way to remotely access your EC2 instances.
Prerequisites
Before starting, make sure that you have the following:
- AWS CLI installed and configured on your local machine. You can follow the instructions on Installing the AWS CLI to install and configure it.
- An IAM user with the following permissions:
- AmazonVPCFullAccess
- AmazonEC2FullAccess
- Basic knowledge of networking and SSH
To create an IAM user, follow the instructions on Creating an IAM User
You will also need to have the AWS CLI configured with your access keys for the IAM user you created above. This can be done by running aws configure in the command line and providing your access key and secret key.
Create VPC
In this section, we will create a Virtual Private Cloud (VPC) and its resources such as subnets, internet gateways, etc. This VPC will be the foundation for our Bastion Host, providing a secure and isolated network environment.
Step 1: Create VPC
First, we need to create a VPC, run the following command:
AWS_VPC=$(aws ec2 create-vpc \  --cidr-block 10.0.0.0/16 \  --query 'Vpc.VpcId' \  --output text)
aws ec2 create-tags \  --resources $AWS_VPC \  --tags Key=Name,Value=vpc
The above command will create a VPC with the CIDR block of 10.0.0.0/16 and create a name tag for it. The VpcId of the created VPC will be stored in the variable $AWS_VPC for future reference.
Step 2: Modify your VPC and enable DNS hostname and DNS support
In this step, we will enable both the DNS hostname and DNS support on our VPC. Enabling these features will allow our instances to resolve DNS hostnames and domain names. By default, these features are disabled when you create a VPC.
aws ec2 modify-vpc-attribute \  --vpc-id $AWS_VPC \  --enable-dns-hostnames "{\"Value\":true}"
aws ec2 modify-vpc-attribute \  --vpc-id $AWS_VPC \  --enable-dns-support "{\"Value\":true}"
The above commands will enable the DNS hostname and DNS support for our VPC. --vpc-id $AWS_VPC this flag tells the command on which vpc you want to enable these features, where the $AWS_VPC is a variable that we set in the previous step when we created the VPC.
Step 3: Create a Public and a Private subnet
In this step, we will create two subnets: one public and one private. A public subnet is a subnet that’s connected to the internet through an internet gateway, whereas a private subnet is a subnet that’s isolated from the internet and can only access the internet through a NAT gateway or VPN connection. In this case, we will connect our Bastion Host to the public subnet and the EC2 instances that we want to access remotely to the private subnet.
AWS_PUBLIC_SUBNET=$(aws ec2 create-subnet \  --vpc-id $AWS_VPC \  --cidr-block 10.0.0.0/24 \  --query 'Subnet.SubnetId' \  --output text)
AWS_PRIVATE_SUBNET=$(aws ec2 create-subnet \  --vpc-id $AWS_VPC \  --cidr-block 10.0.16.0/24 \  --query 'Subnet.SubnetId' \  --output text)
aws ec2 create-tags \  --resources $AWS_PUBLIC_SUBNET \  --tags Key=Name,Value=public-subnet
aws ec2 create-tags \  --resources $AWS_PRIVATE_SUBNET \  --tags Key=Name,Value=private-subnet
The above command will create two subnets, one with a CIDR block of 10.0.0.0/24 (public) and one with a CIDR block of 10.0.16.0/24 (private) and will associate them with the $AWS_VPC VPC we created earlier. Also, it will add names to the subnet for the better organization and management, The subnet IDs are stored in the variables $AWS_PUBLIC_SUBNET and $AWS_PRIVATE_SUBNET for future reference.
Step 4: Enable Auto-assign Public IP on the Public Subnet
In this step, we will enable Auto-assign Public IP on the public subnet, which will allow instances launched in this subnet to automatically receive a public IP address. This is necessary for instances that need direct internet access.
aws ec2 modify-subnet-attribute \ --subnet-id $AWS_PUBLIC_SUBNET \ --map-public-ip-on-launchThe above command will enable the Auto-assign Public IP feature for the public subnet identified by the $AWS_PUBLIC_SUBNETvariable. This feature tells the AWS to automatically assign a public IP to the instances launched in this subnet.
It’s worth noting that, you can also assign public IP addresses to instances by using Elastic IP addresses, a feature that allows you to allocate an IP address to your AWS account and then associate it with an instance. The advantage of Elastic IP addresses is that they can be moved between instances or be released when no longer needed, avoiding the extra charges that come with using an automatically assigned public IP address.
Step 5: Create an Internet Gateway
In this step, we will create an Internet Gateway and associate it with our VPC. An Internet Gateway is a VPC component that allows communication between instances in our VPC and the internet. This is a necessary step for our public subnet instances to have internet access.
AWS_INTERNET_GATEWAY=$(aws ec2 create-internet-gateway \  --query 'InternetGateway.InternetGatewayId' \  --output text)
aws ec2 create-tags \  --resources $AWS_INTERNET_GATEWAY \  --tags Key=Name,Value=internet-gateway
aws ec2 attach-internet-gateway \  --vpc-id $AWS_VPC \  --internet-gateway-id $AWS_INTERNET_GATEWAY
The above command will create an Internet Gateway, create a name tag for it and attach it to the VPC identified by the $AWS_VPC variable. The Internet Gateway ID is stored in the variable $AWS_INTERNET_GATEWAY for future reference.
It’s worth noting that, Internet Gateways are stateful, meaning that if a request initiated from your VPC is sent to an Internet Gateway, the response will be routed back to the source. On the other hand, a Virtual Private Gateway is stateless, meaning that it routes traffic but does not hold connection state. It’s important to choose the correct type of gateway depending on your use case.
Step 6: Create a Elastic IP
In this step, we will create a Elastic IP, which is a static public IPv4 address that can be allocated to your AWS account and then associated with an instance. Having a Elastic IP address allows you to mask the failure of an instance by rapidly remapping the address to another instance. This is useful when instances fail or if you want to change instances while keeping the same IP address.
AWS_ELASTIC_IP=$(aws ec2 allocate-address \  --domain vpc \  --query 'AllocationId' \  --output text)
aws ec2 create-tags \  --resources $AWS_ELASTIC_IP \  --tags Key=Name,Value=elastic-ip
The above command will allocate a new Elastic IP for your AWS account, and create a name tag for it. The Elastic IP address is stored in the variable $AWS_ELASTIC_IP for future reference.
It’s worth noting that, Elastic IP addresses are charged for hourly usage when not associated with a running instance or when associated with a stopped instance or an unattached network interface. so, if you’re not using it make sure you release it to avoid any charges.
Step 7: Create a NAT Gateway
In this step, we will create a NAT Gateway and associate it with our VPC. A NAT Gateway allows instances in a private subnet to access the internet without exposing their private IP address. It is a highly available, managed service that allows outbound internet traffic from instances in a private subnet in your virtual private cloud (VPC). This is a necessary step for our private subnet instances to have internet access.
AWS_NAT_GATEWAY=$(aws ec2 create-nat-gateway \  --subnet-id $AWS_PUBLIC_SUBNET \  --allocation-id $AWS_ELASTIC_IP \  --query 'NatGateway.NatGatewayId' \  --output text)
aws ec2 create-tags \  --resources $AWS_NAT_GATEWAY \  --tags Key=Name,Value=nat-gateway
The above command will create a NAT Gateway, associated it with the public subnet identified by the $AWS_PUBLIC_SUBNET variable, and using the Elastic IP that we allocated previously identified by $AWS_ELASTIC_IP, also, it will create a name tag for it. The NAT Gateway ID is stored in the variable $AWS_NAT_GATEWAY for future reference.
It’s worth noting that, the NAT Gateway requires a pre-allocated Elastic IP in order to be created, and this Elastic IP is consumed by the NAT Gateway and will not be available for other uses. Also, the NAT Gateway is a managed service, which means that AWS will take care of the maintenance and availability of the NAT Gateway, so you don’t have to worry about it.
Step 8: Create a Public and a Private Route Table
In this step, we will create two route tables: one public and one private. A route table contains a set of rules, called routes, that are used to determine where network traffic is directed. By creating separate route tables for our public and private subnets, we can ensure that traffic is routed correctly.
AWS_PUBLIC_ROUTE_TABLE=$(aws ec2 create-route-table \  --vpc-id $AWS_VPC \  --query 'RouteTable.RouteTableId' \  --output text)
AWS_PRIVATE_ROUTE_TABLE=$(aws ec2 create-route-table \  --vpc-id $AWS_VPC \  --query 'RouteTable.RouteTableId' \  --output text)
aws ec2 create-tags \  --resources $AWS_PUBLIC_ROUTE_TABLE \  --tags Key=Name,Value=public-route-table
aws ec2 create-tags \  --resources $AWS_PRIVATE_ROUTE_TABLE \  --tags Key=Name,Value=private-route-table
The above command will create two route tables associated with the VPC identified by the $AWS_VPC variable and create names for them “public-route-table” and “private-route-table” and will store the route table IDs in the variables $AWS_PUBLIC_ROUTE_TABLEand$AWS_PRIVATE_ROUTE_TABLE respectively for future reference.
Step 9: Create a Route in the Public Route Table for Internet Gateway
In this step, we will create a route in the public route table that directs all traffic to the Internet Gateway. This is necessary for instances in the public subnet to have internet access.
aws ec2 create-route \ --route-table-id $AWS_PUBLIC_ROUTE_TABLE \ --destination-cidr-block 0.0.0.0/0 \ --gateway-id $AWS_INTERNET_GATEWAYThe above command will create a route in the public route table that directs all traffic (destination CIDR block 0.0.0.0/0) to the Internet Gateway identified by the $AWS_INTERNET_GATEWAY variable. This will allow instances in the public subnet to access the internet.
It’s worth noting that, when you create a route in a route table, the route is propagated to all associated subnets, so it is important to make sure that you are creating the route in the correct route table.
Step 10: Create a Route in the Private Route Table for NAT Gateway
In this step, we will create a route in the private route table that directs all traffic to the NAT Gateway. This is necessary for instances in the private subnet to have internet access without exposing their private IP addresses.
aws ec2 create-route \ --route-table-id $AWS_PRIVATE_ROUTE_TABLE \ --destination-cidr-block 0.0.0.0/0 \ --nat-gateway-id $AWS_NAT_GATEWAYThe above command will create a route in the private route table that directs all traffic (destination CIDR block 0.0.0.0/0) to the NAT Gateway identified by the $AWS_NAT_GATEWAY variable. This will allow instances in the private subnet to access the internet without exposing their private IP addresses.
It’s worth noting that, It is important that instances in the private subnet are not able to initiate direct internet access. This will help to protect your instances from malicious Internet traffic and also reduce the risk of accidental data leaks.
Step 11: Associate the Subnets with the Route Tables
In this step, we will associate the public and private subnets with the corresponding public and private route tables. This will ensure that traffic is routed correctly.
aws ec2 associate-route-table \  --route-table-id $AWS_PUBLIC_ROUTE_TABLE \  --subnet-id $AWS_PUBLIC_SUBNET
aws ec2 associate-route-table \  --route-table-id $AWS_PRIVATE_ROUTE_TABLE \  --subnet-id $AWS_PRIVATE_SUBNET
The above command will associate the public subnet identified by the $AWS_PUBLIC_SUBNET variable with the public route table identified by the $AWS_PUBLIC_ROUTE_TABLE variable, and the private subnet identified by the $AWS_PRIVATE_SUBNET variable with the private route table identified by the $AWS_PRIVATE_ROUTE_TABLE variable.
This ensures that traffic is directed to the correct destination based on the subnet it originates from, by this way, traffic originating from the public subnet will be directed to the Internet Gateway and traffic originating from the private subnet will be directed to the NAT Gateway, this ensures that instances in the public subnet have internet access, and instances in the private subnet have internet access without exposing their private IP addresses.
Step 12: Create Security Groups
In this step, we will create security groups for the bastion host and the instances in the private subnet. Security groups act as a virtual firewall for your instances, controlling inbound and outbound traffic.
AWS_BASTION_SECURITY_GROUP=$(aws ec2 create-security-group \  --group-name bastion-security-group \  --description "Security group for the bastion host" \  --vpc-id $AWS_VPC \  --query 'GroupId' \  --output text)
AWS_PRIVATE_SECURITY_GROUP=$(aws ec2 create-security-group \  --group-name private-security-group \  --description "Security group for the private instances" \  --vpc-id $AWS_VPC \  --query 'GroupId' \  --output text)
aws ec2 create-tags \  --resources $AWS_BASTION_SECURITY_GROUP \  --tags Key=Name,Value=bastion-security-group
aws ec2 create-tags \  --resources $AWS_PRIVATE_SECURITY_GROUP \  --tags Key=Name,Value=private-security-group
aws ec2 authorize-security-group-ingress \  --group-id $AWS_BASTION_SECURITY_GROUP \  --protocol tcp \  --port 22 \  --cidr 0.0.0.0/0 \  --output text
aws ec2 authorize-security-group-ingress \  --group-id $AWS_PRIVATE_SECURITY_GROUP \  --protocol tcp \  --port 22 \  --source-group $AWS_BASTION_SECURITY_GROUP \  --output text
The above command will create two security groups: one for the bastion host, and one for the instances in the private subnet.
The security group for the bastion host is named “bastion-security-group”, and it is associated with the VPC identified by the $AWS_VPC variable. It allows inbound traffic on port 22 (SSH) from any IP address (CIDR block 0.0.0.0/0) and It is useful to connect to instances via the bastion host.
The security group for the instances in the private subnet is named “private-security-group”, and it is also associated with the VPC identified by the $AWS_VPC variable. It allows all inbound traffic from the security group for the bastion host only, this way, instances in the private subnet can only be accessed via the bastion host and only from instances that are within the security group for the bastion host.
It’s worth noting that, These security groups will help ensure that only authorized traffic can reach your instances, and that traffic from your instances to the Internet is properly restricted.
Create a Two EC2 Instances
In this step, we will create two EC2 instances: one for the bastion host and one for the private subnet. Before creating these instances, you need to create an ssh key pair that will be used to access the instances via ssh.
Step 1: Create a Key Pair
In order to connect to the instances via SSH, you will need to create a Key Pair that will be used to authenticate the connection. To create a Key Pair, you can use the AWS Management Console, AWS CLI or SDKs.
AWS_KEY_PAIR=aws-key-pairaws ec2 create-key-pair \ --key-name $AWS_KEY_PAIR \ --query 'KeyMaterial' \ --output text > $AWS_KEY_PAIR.pemchmod 400 $AWS_KEY_PAIR.pemThe above command will create a new key pair named aws-key-pair and the private key will be saved in the file aws-key-pair.pem . Make sure to keep this file safe and secure, as it allows you to connect to the instances. The chmod 400 command will restrict the permissions on the key pair file so that it is only readable by the owner.
Also, you may want to consider using environment variables for the key pair name, this way you can easily change the key pair name without having to search and replace it in the script.
Step 2: Get the latest AMI ID for Amazon Linux 2
Before launching an EC2 instance, we need to know the Amazon Machine Image (AMI) ID for the specific Operating System we want to use, in this case Amazon Linux 2. The AMI ID is used to specify the image for the instance when it’s being created. Instead of hard coding the AMI ID, it’s better to programmatically find the latest available AMI ID for the specific Operating System to ensure that the script will always use the latest version of the AMI.
# Get the latest AMI ID for Amazon Linux 2AWS_AMI=$(aws ec2 describe-images \ --owners 'amazon' \ --filters 'Name=name,Values=amzn2-ami-hvm-2.0.*' \ 'Name=state,Values=available' \ --query 'sort_by(Images, &CreationDate)[-1].[ImageId]' \ --output 'text')The above command will get the latest available Amazon Linux 2 AMI ID based on the filters provided. The --owners option specifies that the AMI should be owned by Amazon. The --filters option is used to filter the images returned by the describe-images command. The Name=name,Values=amzn2-ami-hvm-2.0.* filter will return only the images that have a name that starts with amzn2-ami-hvm-2.0. The Name=state,Values=available filter will return only the images that are in the available state.
Step 3: Create a Bastion Host
In this step, we will use the run-instances command to launch an EC2 instance for our Bastion host. The Bastion host will be used as a jump server to securely access the instances in the private subnet.
AWS_BASTION_HOST=$(aws ec2 run-instances \  --image-id $AWS_AMI \  --count 1 \  --instance-type t2.micro \  --key-name $AWS_KEY_PAIR \  --security-group-ids $AWS_BASTION_SECURITY_GROUP \  --subnet-id $AWS_PUBLIC_SUBNET \  --associate-public-ip-address \  --query 'Instances[0].InstanceId' \  --output text)
aws ec2 create-tags \  --resources $AWS_BASTION_HOST \  --tags Key=Name,Value=bastion-host
The above command will create a single EC2 instance in the public subnet with the provided AMI ID and Key Pair, will be associated with the security group that we created earlier for the Bastion host, and it will be assigned a public IP address so that it can be accessed over the internet.
The tag specifications was added to assign the Name value to the created instances.
It’s also worth to note that you should consider to specify the availability zone, this way you can ensure that the instances are created in the availability zone that meets your requirements (i.e. the availability zone should have enough capacity to meet the instances requirements, etc.)
Step 4: Create a Private Host
In this step, we will use the run-instances command to launch an EC2 instance for our Private host. The private host will be running in a private subnet and it will not have public IP address.
AWS_PRIVATE_HOST=$(aws ec2 run-instances \  --image-id $AWS_AMI \  --count 1 \  --instance-type t2.micro \  --key-name $AWS_KEY_PAIR \  --security-group-ids $AWS_PRIVATE_SECURITY_GROUP \  --subnet-id $AWS_PRIVATE_SUBNET \  --query 'Instances[0].InstanceId' \  --output text)
aws ec2 create-tags \  --resources $AWS_PRIVATE_HOST \  --tags Key=Name,Value=private-host
The above command will create a single EC2 instance in the private subnet with the provided AMI ID and Key Pair, will be associated with the security group that we created earlier for the private host, and it will not be assigned a public IP address.
As the bastion host will act as the gateway to access the instances in private subnet via ssh.
It’s also worth to note that you should consider to specify the availability zone, this way you can ensure that the instances are created in the availability zone that meets your requirements (i.e. the availability zone should have enough capacity to meet the instances requirements, etc.)
Connect to the Private Host
In this section, we will show you how to connect to the Private host using the Bastion host as a jump server.
Step 1: Get the Public IP Address of the Bastion Host
To connect to the private host, we first need to know the public IP address of the Bastion host. We can use the describe-instances command to get the public IP address of the Bastion host.
AWS_BASTION_HOST_PUBLIC_IP=$(aws ec2 describe-instances \ --instance-ids $AWS_BASTION_HOST \ --query 'Reservations[0].Instances[0].PublicIpAddress' \ --output text)The above command will get the public IP address of the Bastion host based on the instance ID.
Once you have the public IP address of the Bastion host, you can use it to establish an SSH connection to the Bastion host.
Step 2: Connect to the Bastion Host
To connect to the Bastion Host, run the following command:
ssh -i $AWS_KEY_PAIR.pem ec2-user@$AWS_BASTION_HOST_PUBLIC_IPThe above command will connect to the Bastion host using the key pair that we created earlier, and the public IP address of the Bastion host.

Step 3: Get the Private IP Address of the Private Host
To connect to the private host via the Bastion host, we will need to know the private IP address of the private host. We can use the describe-instances command to get the private IP address of the private host.
AWS_PRIVATE_HOST_PRIVATE_IP=$(aws ec2 describe-instances \ --instance-ids $AWS_PRIVATE_HOST \ --query 'Reservations[0].Instances[0].PrivateIpAddress' \ --output text)The above command will get the private IP address of the private host based on the instance ID and the output will be a text with the private ip address, you can use it in the next step.
It’s worth to note that you could also use the Name tag that we created earlier to retrieve the private IP address using the --filters option, this way you can get the private IP address of the private host without knowing the instance ID.
AWS_PRIVATE_HOST_PRIVATE_IP=$(aws ec2 describe-instances \ --filters "Name=tag:Name,Values=private-host" \ --query 'Reservations[0].Instances[0].PrivateIpAddress' \ --output text)Step 4: Connect to the Private Host
Once you have the private IP address of the private host, you can use the following command to connect to the private host via the Bastion host:
# add the private keyvi ~/.ssh/private-key.pem
# change the permission of the private keychmod 400 ~/.ssh/private-key.pem
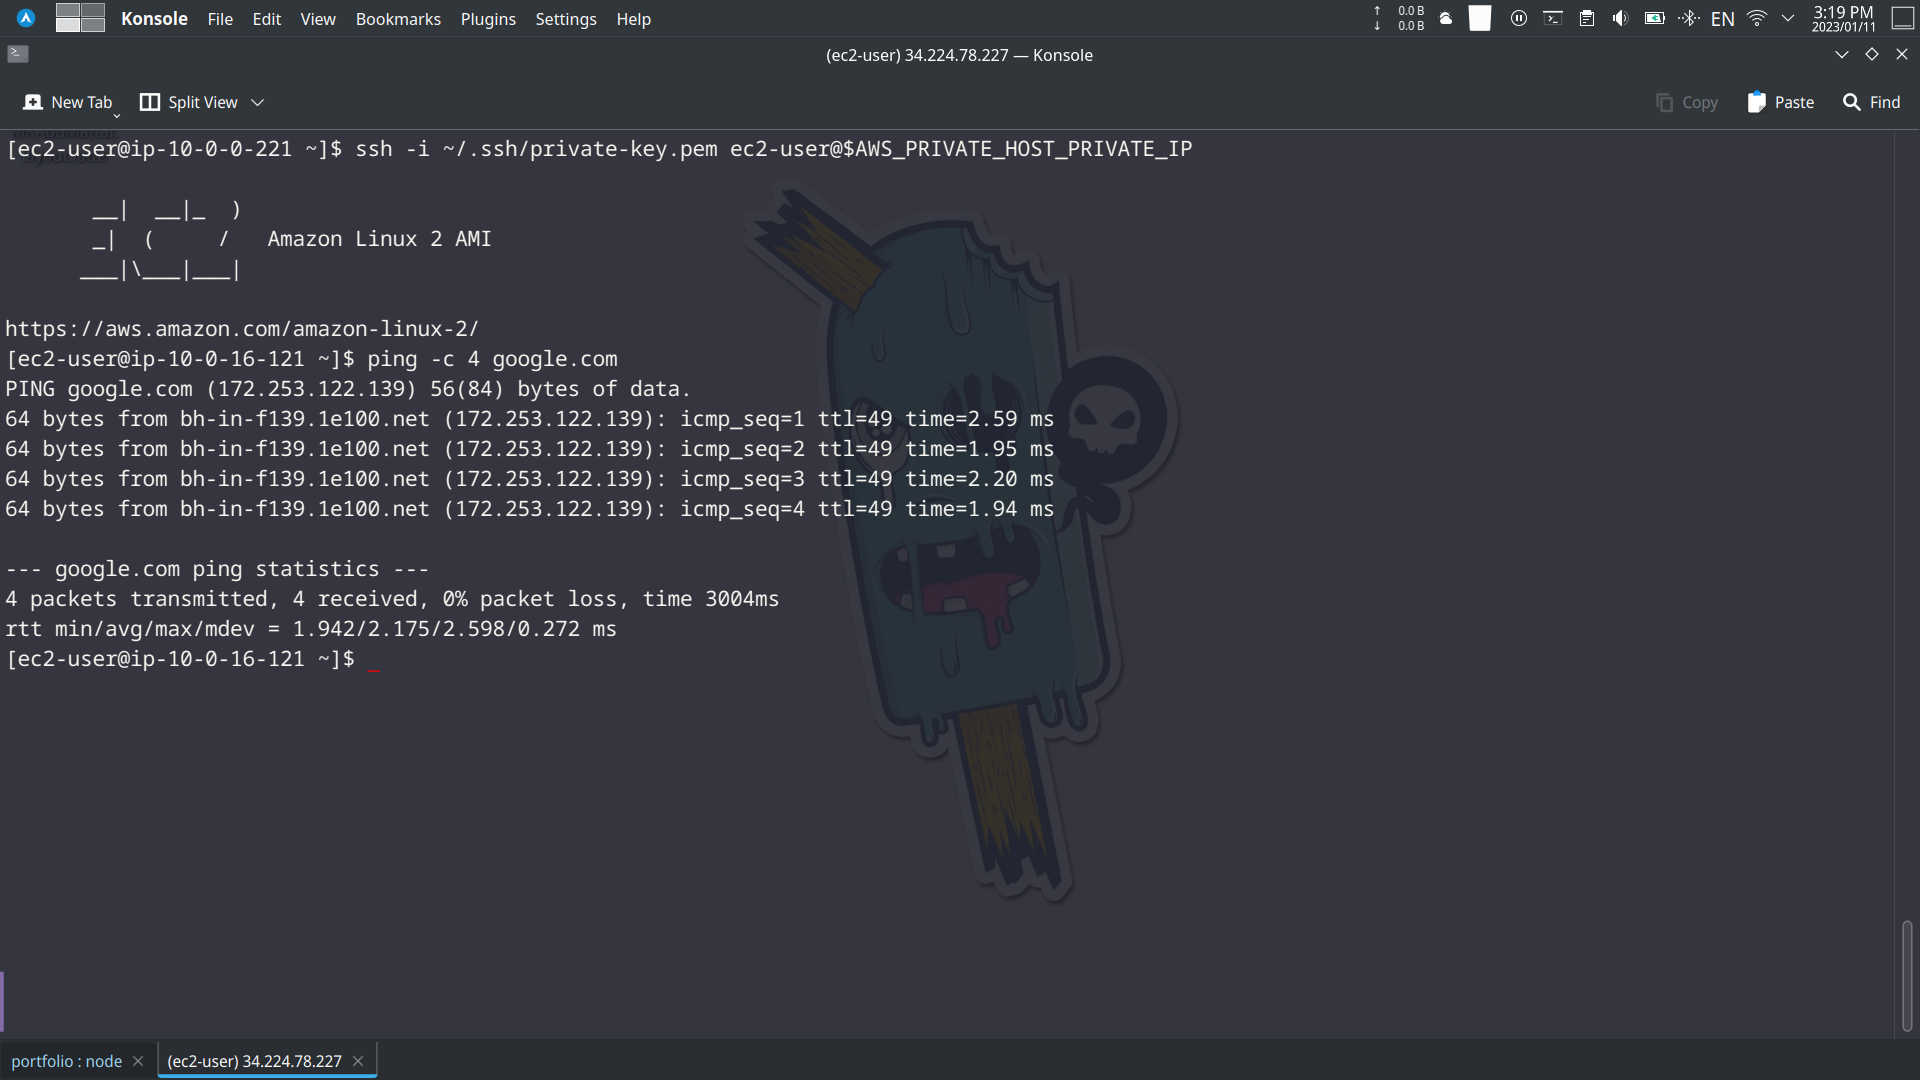
# connect to the private hostssh -i ~/.ssh/private-key.pem ec2-user@$AWS_PRIVATE_HOST_PRIVATE_IP
The above command will connect to the private host using the private key that we created earlier, and the private IP address of the private host.
Step 5: Check the Internet Connectivity
Now that you are connected to the private host, you can check if the host has internet connectivity by pinging a public IP or URL:
ping -c 4 google.comThe above command will send 4 ICMP echo requests to the IP address of Google’s website, and the private host will respond with 4 ICMP echo replies if it can reach the internet. This verifies that the NAT gateway and route tables are configured correctly.
Alternatively, you can also check internet connectivity by using curl command to download a webpage:
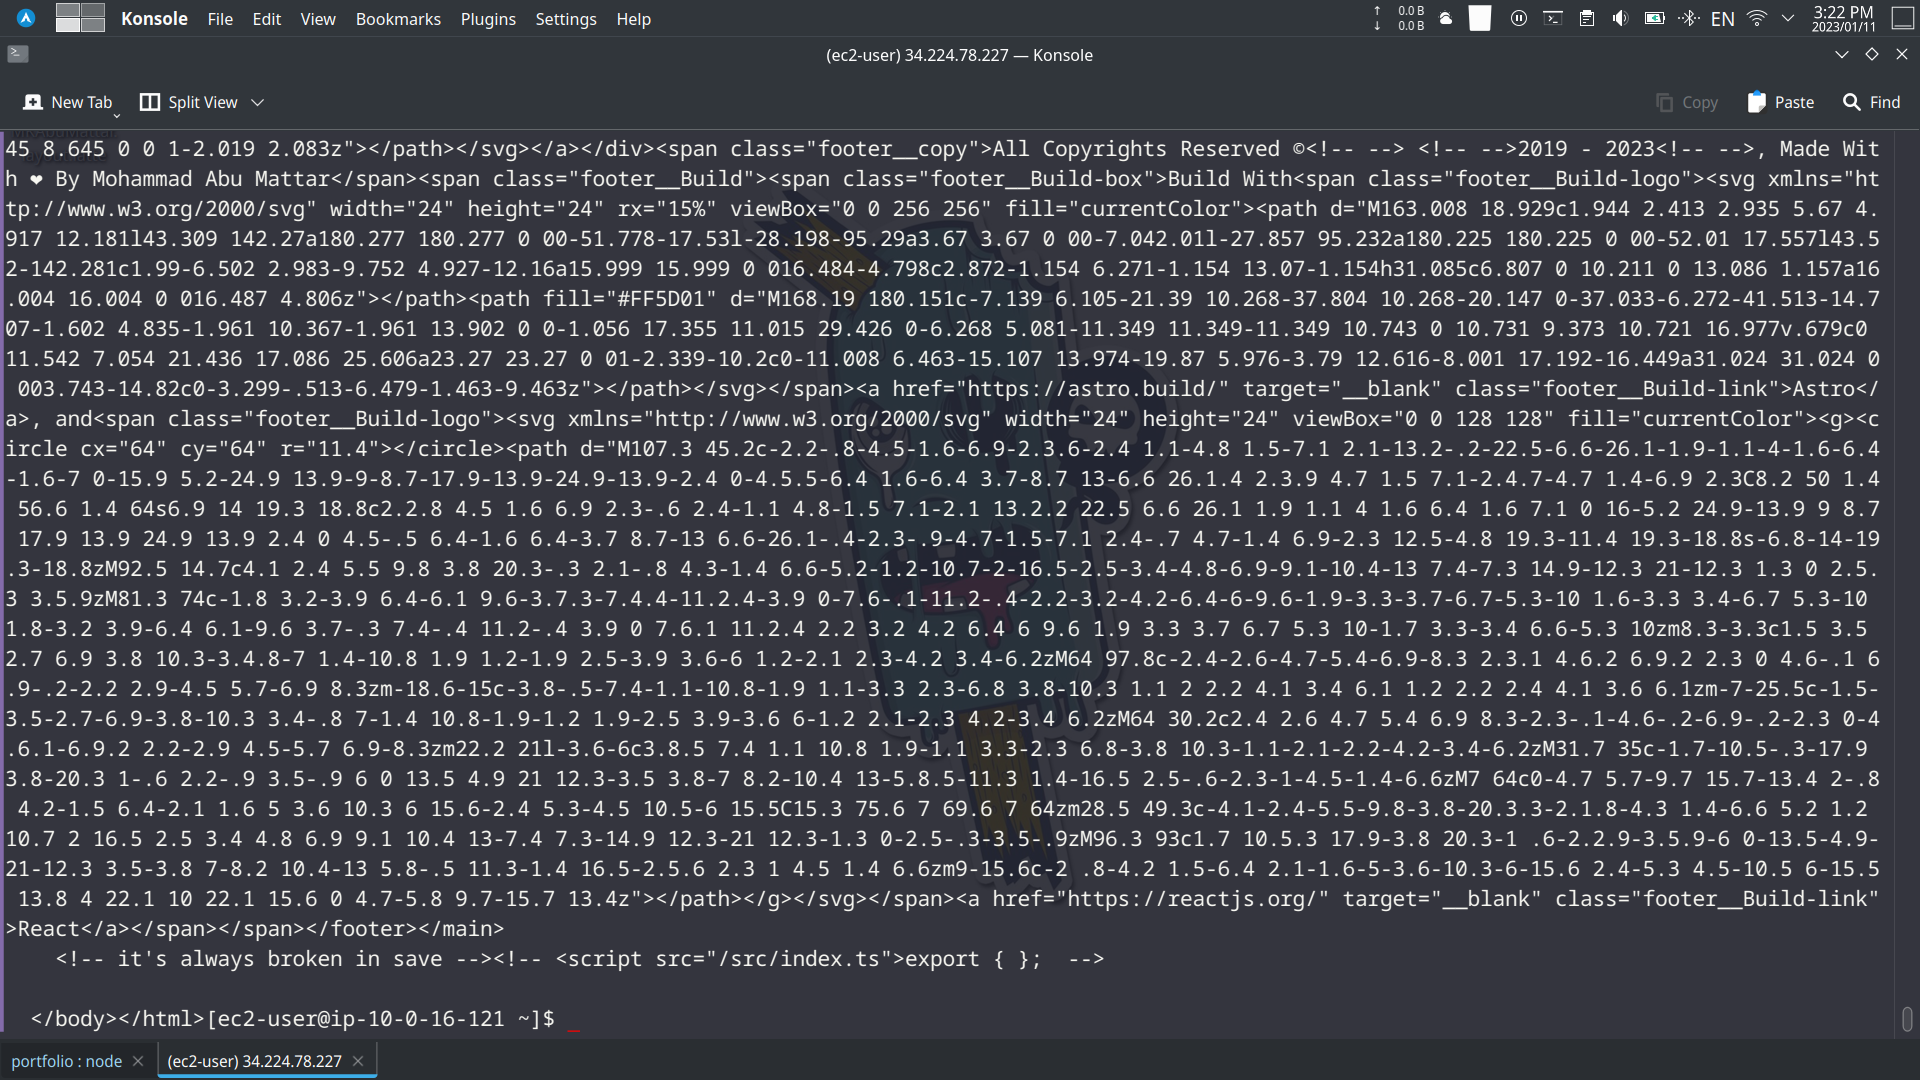
curl -s https://www.mkabumattar.com | head -n 10This will download the website’s source code and will return it to the terminal, and check if the response is received from the website. If the private host has internet connectivity, it will show the webpage’s source code.
It is important to note that, if you are running these commands from the bastion host, you might not face the same restrictions as the private host, in that case you should run the commands from the private host, or you could use a specific website for the test that is blocked for your private network
Conclusion
In this tutorial, we walked through the process of creating a Bastion host on AWS using the AWS CLI. We created a VPC, subnets, an Internet gateway, a NAT gateway, route tables, security groups, and two EC2 instances. We then connected to the private host via the Bastion host and verified internet connectivity on the private host.
It is important to note that this is just a basic setup, you might want to improve your security by using a more secure authentication method other than the key pair, such as IAM roles and SSM session manager, also you should consider adding extra logging, auditing, and monitoring to your setup.
Thank you for reading this tutorial and I hope you found it useful. If you have any questions or feedback, feel free to leave a comment below.
Cleanup
When you are finished using the resources created in this tutorial, you should clean them up to avoid incurring unnecessary charges.
You can use the AWS Management Console, or the AWS CLI to delete the resources.
Note
Be careful when running the following commands, as they will delete the resources created in this tutorial
Delete the EC2 Instances
aws ec2 terminate-instances --instance-ids $AWS_BASTION_HOST $AWS_PRIVATE_HOSTThis command will delete the two EC2 instances created in this tutorial.
Detach and Delete Internet Gateway
aws ec2 detach-internet-gateway --internet-gateway-id $AWS_INTERNET_GATEWAY --vpc-id $AWS_VPCaws ec2 delete-internet-gateway --internet-gateway-id $AWS_INTERNET_GATEWAYThis command will detach and delete the Internet gateway created in this tutorial.
Delete Route Tables
aws ec2 delete-route-table --route-table-id $AWS_PUBLIC_ROUTE_TABLEaws ec2 delete-route-table --route-table-id $AWS_PRIVATE_ROUTE_TABLEThis command will delete the route tables created in this tutorial.
Delete NAT Gateway
# Wait for NAT Gateway to be deleted if it's in 'deleting' stateaws ec2 wait nat-gateway-deleted --nat-gateway-ids $AWS_NAT_GATEWAYaws ec2 delete-nat-gateway --nat-gateway-id $AWS_NAT_GATEWAYThis command will delete the NAT gateway created in this tutorial.
Delete Elastic IP
# Ensure $AWS_ELASTIC_IP holds the AllocationId for release-address# If $AWS_ELASTIC_IP was set to the PublicIp string, you'd need the AllocationId# Assuming $AWS_ELASTIC_IP was set using:# AWS_ELASTIC_IP_ALLOC_ID=$(aws ec2 allocate-address --domain vpc --query 'AllocationId' --output text)# Then use:# aws ec2 release-address --allocation-id $AWS_ELASTIC_IP_ALLOC_ID# If $AWS_ELASTIC_IP was set to the PublicIp string, this command might not work as expected.# For the script in the article, $AWS_ELASTIC_IP stores AllocationId, so the original command is fine.aws ec2 release-address --allocation-id $AWS_ELASTIC_IPDelete Subnets
aws ec2 delete-subnet --subnet-id $AWS_PUBLIC_SUBNETaws ec2 delete-subnet --subnet-id $AWS_PRIVATE_SUBNETThis command will delete the subnets created in this tutorial.
Delete Security Groups
aws ec2 delete-security-group --group-id $AWS_BASTION_SECURITY_GROUPaws ec2 delete-security-group --group-id $AWS_PRIVATE_SECURITY_GROUPThis command will delete the security groups created in this tutorial.
Delete VPC
aws ec2 delete-vpc --vpc-id $AWS_VPCDelete Key Pair
aws ec2 delete-key-pair --key-name $AWS_KEY_PAIRrm -f $AWS_KEY_PAIR.pemThis command will delete the key pair created in this tutorial and also the key file from the local system.
It is important to note that some resources may take a while to be fully deleted and some resources are dependent on others, so you may need to run the deletion commands multiple times and in a specific order.
Also, you should check if there are any other resources that were created outside of the scope of this tutorial but are still associated with the VPC, subnet, security groups, and key pairs, and delete them as well.
References
- AWS Command Line Interface (CLI) User Guide
- AWS Identity and Access Management (IAM) User Guide
- Amazon Virtual Private Cloud (VPC) User Guide
- Amazon EC2 User Guide for Linux Instances
- Security Groups for your VPC - Amazon VPC
- NAT Gateways - Amazon VPC
- Internet Gateways - Amazon VPC
- AWS Key Pairs and Amazon EC2 Instances
- Linux Bastion Hosts on AWS (Quick Start Reference Deployment)
- What is an Elastic IP address? - Amazon EC2
- Connect to your Linux instance using SSH - Amazon EC2
- AWS CLI Command Reference - ec2 create-vpc
- AWS CLI Command Reference - ec2 run-instances
- AWS Well-Architected Framework - Security Pillar
