Introduction
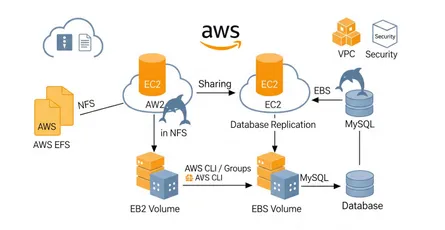
In this post, I will show you how to connect a two EC2 instances data transfer using AWS CLI without AWS EFS.
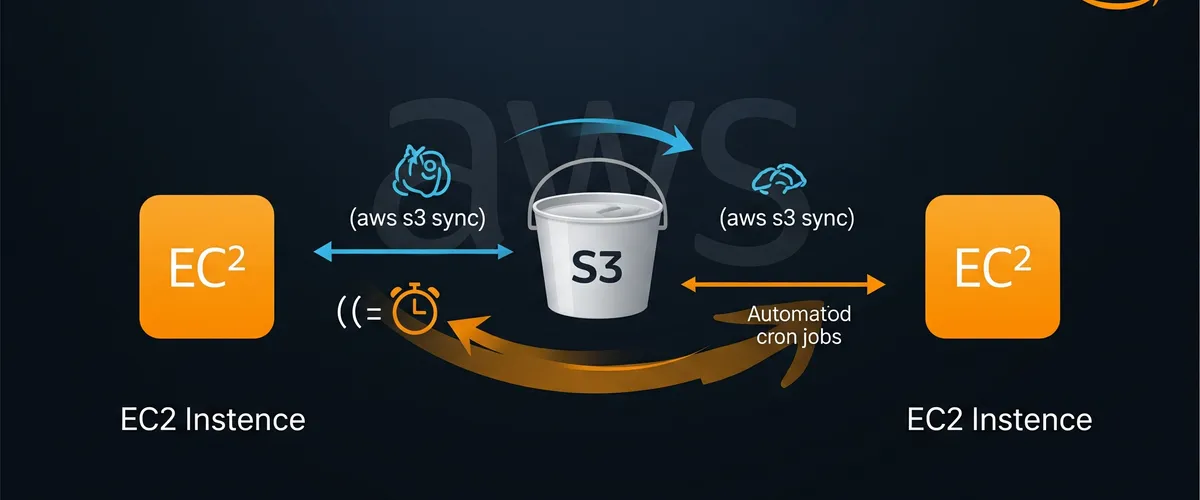
We will use AWS S3 bucket to transfer data between two EC2 instances. We will create a AWS S3 bucket and upload a file to it. Then we will download the file from the AWS S3 bucket to the other EC2 instance.
Why we will use AWS S3 bucket to transfer data between two EC2 instances? Because AWS S3 bucket is a highly available, durable, and scalable object storage service. It is designed to make web-scale computing easier for developers.
There are other ways to transfer data between two EC2 instances. For example, you can use AWS EFS to transfer data between two EC2 instances. But AWS EFS is a file storage service for use with Amazon EC2 instances in the AWS Cloud. It provides a simple, scalable, fully managed elastic NFS file system for use with Linux-based workloads.
Prerequisites
You need to have:
- AWS CLI installed and configured
- IAM user with the following permissions:
- AmazonEC2FullAccess
- AmazonS3FullAccess
- AmazonVPCFullAccess
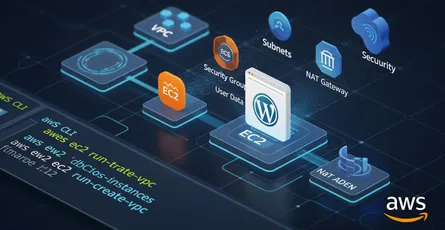
Create VPC
Step 1: Create VPC
To create a VPC, run the following command:
# Create a VPCAWS_VPC=$(aws ec2 create-vpc \ --cidr-block 10.0.0.0/16 \ --query 'Vpc.VpcId' \ --output text)
# Add a name tag to the VPCaws ec2 create-tags \ --resources $AWS_VPC \ --tags Key=Name,Value=aws-vpcExplanation:
aws ec2 create-vpc- Create a VPC--cidr-block- The IPv4 network range for the VPC, in CIDR notation.--query- The JMESPath query that is applied to the output.--output- The output format of the command.--resources- The IDs of the resources.--tags- The tags to apply to the resource.
Step 2: Modify your custom VPC and enable DNS hostname support, and DNS support
To modify your custom VPC and enable DNS hostname support, and DNS support, run the following command:
# Enable DNS hostnamesaws ec2 modify-vpc-attribute \ --vpc-id $AWS_VPC \ --enable-dns-hostnames "{\"Value\":true}"
# Enable DNS supportaws ec2 modify-vpc-attribute \ --vpc-id $AWS_VPC \ --enable-dns-support "{\"Value\":true}"Explanation:
aws ec2 modify-vpc-attribute- Modifies the specified attribute of the specified VPC.--vpc-id- The ID of the VPC.--enable-dns-hostnames- Indicates whether the instances launched in the VPC get DNS hostnames.--enable-dns-support- Indicates whether DNS resolution is supported for the VPC.
Step 3: Create a Public Subnet
To create a public subnet, run the following command:
# Create a public subnetAWS_PUBLIC_SUBNET=$(aws ec2 create-subnet \ --vpc-id $AWS_VPC \ --cidr-block 10.0.1.0/24 \ --query 'Subnet.SubnetId' \ --output text)
# Add a name tag to the public subnetaws ec2 create-tags \ --resources $AWS_PUBLIC_SUBNET \ --tags Key=Name,Value=aws-public-subnetExplanation:
aws ec2 create-subnet- Creates a subnet in an existing VPC.--vpc-id- The ID of the VPC.--cidr-block- The IPv4 network range for the subnet, in CIDR notation.--query- The JMESPath query that is applied to the output.--output- The output format of the command.--resources- The IDs of the resources.--tags- The tags to apply to the resource.
Step 4: Enable Auto-assign Public IP on the subnet
To enable auto-assign public IP on the subnet, run the following command:
# Enable auto-assign public IP on the subnetaws ec2 modify-subnet-attribute \ --subnet-id $AWS_PUBLIC_SUBNET \ --map-public-ip-on-launchExplanation:
aws ec2 modify-subnet-attribute- Modifies a subnet attribute.--subnet-id- The ID of the subnet.--map-public-ip-on-launch- Specify true to indicate that network interfaces created in the specified subnet should be assigned a public IPv4 address.
Step 5: Create an Internet Gateway
To create an Internet Gateway, run the following command:
# Create an Internet GatewayAWS_INTERNET_GATEWAY=$(aws ec2 create-internet-gateway \ --query 'InternetGateway.InternetGatewayId' \ --output text)
# Add a name tag to the Internet Gatewayaws ec2 create-tags \ --resources $AWS_INTERNET_GATEWAY \ --tags Key=Name,Value=aws-internet-gatewayExplanation:
aws ec2 create-internet-gateway- Creates an Internet gateway for use with a VPC.--query- The JMESPath query that is applied to the output.--output- The output format of the command.--resources- The IDs of the resources.--tags- The tags to apply to the resource.
Step 6: Attach the Internet Gateway to the VPC
To attach the Internet Gateway to the VPC, run the following command:
# Attach the Internet Gateway to the VPCaws ec2 attach-internet-gateway \ --internet-gateway-id $AWS_INTERNET_GATEWAY \ --vpc-id $AWS_VPCExplanation:
aws ec2 attach-internet-gateway- Attaches an Internet gateway to a VPC, enabling connectivity between the Internet and the VPC.--internet-gateway-id- The ID of the Internet gateway.--vpc-id- The ID of the VPC.
Step 7: Create a Route Table
To create a route table, run the following command:
# Create a route tableAWS_ROUTE_TABLE=$(aws ec2 create-route-table \ --vpc-id $AWS_VPC \ --query 'RouteTable.RouteTableId' \ --output text)
# Add a name tag to the route tableaws ec2 create-tags \ --resources $AWS_ROUTE_TABLE \ --tags Key=Name,Value=aws-route-tableExplanation:
aws ec2 create-route-table- Creates a route table for the specified VPC.--vpc-id- The ID of the VPC.--query- The JMESPath query that is applied to the output.--output- The output format of the command.--resources- The IDs of the resources.--tags- The tags to apply to the resource.
Step 8: Create a custom route table association
To create a custom route table association, run the following command:
# Create a custom route table associationaws ec2 associate-route-table \ --subnet-id $AWS_PUBLIC_SUBNET \ --route-table-id $AWS_ROUTE_TABLEExplanation:
aws ec2 associate-route-table- Associates a subnet with a route table.--subnet-id- The ID of the subnet.--route-table-id- The ID of the route table.
Step 9: Associate the subnet with route table, making it a public subnet
To associate the subnet with route table, making it a public subnet, run the following command:
# Associate the subnet with route table, making it a public subnetaws ec2 create-route \ --route-table-id $AWS_ROUTE_TABLE \ --destination-cidr-block 0.0.0.0/0 \ --gateway-id $AWS_INTERNET_GATEWAYExplanation:
aws ec2 create-route- Creates a route in a route table within a VPC.--route-table-id- The ID of the route table for the route.--destination-cidr-block- The IPv4 CIDR address block used for the destination match.--gateway-id- The ID of an Internet gateway or virtual private gateway attached to your VPC.
Step 10: Create a Security Group
To create a security group, run the following command:
# Create a security groupAWS_SECURITY_GROUP=$(aws ec2 create-security-group \ --group-name aws-security-group \ --description "AWS Security Group" \ --vpc-id $AWS_VPC \ --query 'GroupId' \ --output text)
# Add a name tag to the security groupaws ec2 create-tags \ --resources $AWS_SECURITY_GROUP \ --tags Key=Name,Value=aws-security-groupExplanation:
aws ec2 create-security-group- Creates a security group.--group-name- The name of the security group.--description- A description for the security group.--vpc-id- The ID of the VPC.--query- The JMESPath query that is applied to the output.--output- The output format of the command.--resources- The IDs of the resources.--tags- The tags to apply to the resource.
Step 11: Add a rule to the security group
To add a rule to the security group, run the following command:
# Add a rule to the security group
# Add SSH ruleaws ec2 authorize-security-group-ingress \--group-id $AWS_SECURITY_GROUP \--protocol tcp \--port 22 \--cidr 0.0.0.0/0 \--output text
# Add HTTP ruleaws ec2 authorize-security-group-ingress \--group-id $AWS_SECURITY_GROUP \--protocol tcp \--port 80 \--cidr 0.0.0.0/0 \--output text
# Add HTTPS ruleaws ec2 authorize-security-group-ingress \--group-id $AWS_SECURITY_GROUP \--protocol tcp \--port 443 \--cidr 0.0.0.0/0 \--output textExplanation:
aws ec2 authorize-security-group-ingress- Adds one or more ingress rules to a security group.--group-id- The ID of the security group.--protocol- The IP protocol name or number.--port- The port number.--cidr- The IPv4 CIDR range.--output- The output format of the command.
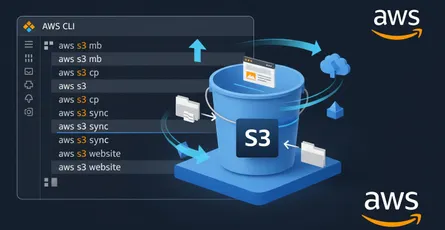
Create an S3 Bucket
Step 1: Create an S3 Bucket
To create an S3 bucket, run the following command:
AWS_S3_BUCKET_NAME=aws-s3-bucket-$(date +%s)# Create an S3 bucketaws s3 mb s3://$AWS_S3_BUCKET_NAMEExplanation:
aws s3 mb- Creates an S3 bucket.s3://$AWS_S3_BUCKET_NAME- The name of the bucket to create.
Create a Two EC2 Instances
Step 1: Get the latest AMI ID
To get the latest AMI ID, run the following command:
# Get the latest AMI IDAWS_AMI=$(aws ec2 describe-images \ --owners 'amazon' \ --filters 'Name=name,Values=amzn2-ami-hvm-2.0.*' \ 'Name=state,Values=available' \ --query 'sort_by(Images, &CreationDate)[-1].[ImageId]' \ --output 'text')Explanation:
aws ec2 describe-images- Describes one or more of the images (AMIs, AKIs, and ARIs) available to you.--owners- Filters the images by the owner.--filters- The filters to apply to the images.--query- The JMESPath query that is applied to the output.--output- The output format of the command.
Step 2: Create a Key Pair
To create a key pair, run the following command:
# Create a key pairaws ec2 create-key-pair \--key-name aws-key-pair \--query 'KeyMaterial' \--output text > aws-key-pair.pem
# Change the permission of the key pairchmod 400 aws-key-pair.pemExplanation:
aws ec2 create-key-pair- Creates a 2048-bit RSA key pair with the specified name.--key-name- The name for the key pair.--query- The JMESPath query that is applied to the output.--output- The output format of the command.chmod 400 aws-key-pair.pem- Changes the permission of the key pair, making it read-only.
Step 3: Create a User Data Script
To create a user data script, that will cron a script to run every minute and sync from and to the S3 bucket, run the following command:
# Create a user data scriptcat <<EOF > user-data.sh#!/bin/bash
# Update the systemyum update -y
# Install Apachesudo yum install httpd -ysudo systemctl start httpdsudo systemctl enable httpd
# Create a cron jobchmod 600 /etc/crontab
# Create a script to sync from and to the S3 bucketcat <<EOT1 > /root/sync.sh#!/bin/bash
# Sync from var/www/html to S3 bucketcd /var/www/htmlaws s3 sync . s3://$AWS_S3_BUCKET_NAME
# Sync from S3 bucket to var/www/htmlcd /var/www/htmlaws s3 sync s3://$AWS_S3_BUCKET_NAME .EOT1
# Make the script executablechmod +x /root/sync.sh
# Add the script to the cron jobecho "* * * * * root /root/sync.sh" >> /etc/crontab
# Create script that creates a random filescat <<EOF2 > /root/create-random-files.sh#!/bin/bash
# Create a random filecd /var/www/htmlRANDOM_FILE_NAME=$(cat /dev/urandom | tr -dc 'a-zA-Z0-9' | fold -w 32 | head -n 1)touch random-file-$RANDOM_FILE_NAME.txtEOF2
# Make the script executablechmod +x /root/create-random-files.sh
# Create a cron job that runs the script every 2 minutesecho "*/2 * * * * root /root/create-random-files.sh" >> /etc/crontab
# Restart the cron servicesystemctl restart crondEOFExplanation:
cat <<EOF > user-data.sh- Creates a file nameduser-data.shand writes the following lines to it.yum update -y- Updates the system.sudo yum install httpd -y- Installs Apache.sudo systemctl start httpd- Starts Apache.sudo systemctl enable httpd- Enables Apache.chmod 600 /etc/crontab- Changes the permission of thecrontabfile, making it read-only.cat <<EOT1 > /root/sync.sh- Creates a file namedsync.shand writes the following lines to it.aws s3 sync . s3://$AWS_S3_BUCKET_NAME- Syncs the files from the current directory to the S3 bucket.aws s3 sync s3://$AWS_S3_BUCKET_NAME .- Syncs the files from the S3 bucket to the current directory.chmod +x /root/sync.sh- Makes thesync.shscript executable.echo "* * * * * root /root/sync.sh" >> /etc/crontab- Adds thesync.shscript to thecrontabfile.cat <<EOF2 > /root/create-random-files.sh- Creates a file namedcreate-random-files.shand writes the following lines to it.cd /var/www/html- Changes the current directory to/var/www/html.RANDOM_FILE_NAME=$(cat /dev/urandom | tr -dc 'a-zA-Z0-9' | fold -w 32 | head -n 1)- Creates a random file name.touch random-file-$RANDOM_FILE_NAME.txt- Creates a random file.chmod +x /root/create-random-files.sh- Makes thecreate-random-files.shscript executable.echo "*/2 * * * * root /root/create-random-files.sh" >> /etc/crontab- Adds thecreate-random-files.shscript to thecrontabfile.systemctl restart crond- Restarts thecrondservice.
Step 4: Create a Two EC2 Instances
To create two EC2 instances, run the following command:
# Create two EC2 instancesAWS_EC2_INSTANCE_1=$(aws ec2 run-instances \--image-id $AWS_AMI \--instance-type t2.micro \--key-name aws-key-pair \--monitoring "Enabled=false" \--security-group-ids $AWS_SECURITY_GROUP \--subnet-id $AWS_PUBLIC_SUBNET \--user-data file://user-data.sh \--query 'Instances[0].InstanceId' \--output text)
AWS_EC2_INSTANCE_2=$(aws ec2 run-instances \--image-id $AWS_AMI \--instance-type t2.micro \--key-name aws-key-pair \--monitoring "Enabled=false" \--security-group-ids $AWS_SECURITY_GROUP \--subnet-id $AWS_PUBLIC_SUBNET \--user-data file://user-data.sh \--query 'Instances[0].InstanceId' \--output text)
# Add a tag to the instancesaws ec2 create-tags \--resources $AWS_EC2_INSTANCE_1 \--tags Key=Name,Value=ec2-instance-1
aws ec2 create-tags \--resources $AWS_EC2_INSTANCE_2 \--tags Key=Name,Value=ec2-instance-2Explanation:
aws ec2 run-instances- Launches the specified number of instances using an AMI for which you have permissions.--image-id- The ID of the AMI.--instance-type- The instance type.--key-name- The name of the key pair.--monitoring- Enables detailed monitoring.--security-group-ids- The IDs of the security groups.--subnet-id- The ID of the subnet in which to launch the instance.--user-data- The user data to make available to the instance.--query- The JMESPath query that is applied to the output.--output- The output format of the command.aws ec2 create-tags- Adds or overwrites one or more tags for the specified resources or resource types.--resources- The IDs of the resources.--tags- The tags to add or overwrite for the specified resources.
Step 5: Check the status of the EC2 instances
To check the status of the EC2 instances, run the following command:
# Check the status of the EC2 instancesaws ec2 describe-instances \--instance-ids $AWS_EC2_INSTANCE_1 $AWS_EC2_INSTANCE_2 \--query 'Reservations[*].Instances[*].[InstanceId,State.Name,PublicIpAddress]' \--output tableExplanation:
aws ec2 describe-instances- Describes one or more of your instances.--instance-ids- The IDs of the instances.--query- The JMESPath query that is applied to the output.--output- The output format of the command.
Conclusion
In this tutorial, you learned how to create a highly available web application using AWS. You also learned how to create a VPC, subnets, and security groups. You also learned how to create an S3 bucket and EC2 instances. You also learned how to create a cron job that syncs the S3 bucket to the Apache directory and vice versa.
Resources
- Amazon S3 User Guide
- Amazon EC2 User Guide for Linux Instances
- Amazon VPC User Guide
- AWS Command Line Interface (CLI) User Guide
- AWS CLI Command Reference - s3 sync
- AWS CLI Command Reference - ec2
- AWS Identity and Access Management (IAM) User Guide
- Scheduling Tasks with Cron
- User data and shell scripts for EC2 instances
- Creating an S3 bucket
- Working with Amazon S3 Buckets
- Security groups for your VPC
- Tutorial: Installing a LAMP Web Server on Amazon Linux 2 (Relevant for Apache setup)
- Transferring data to and from Amazon S3