Introduction
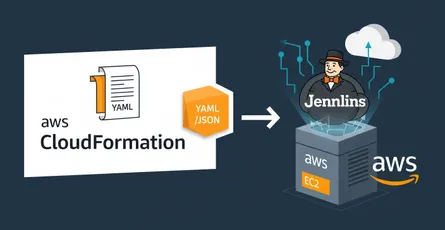
In previous posts, I have shown you how to setup Jenkins on AWS EC2 instance. You can check the post here.
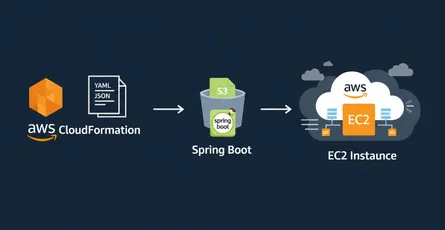
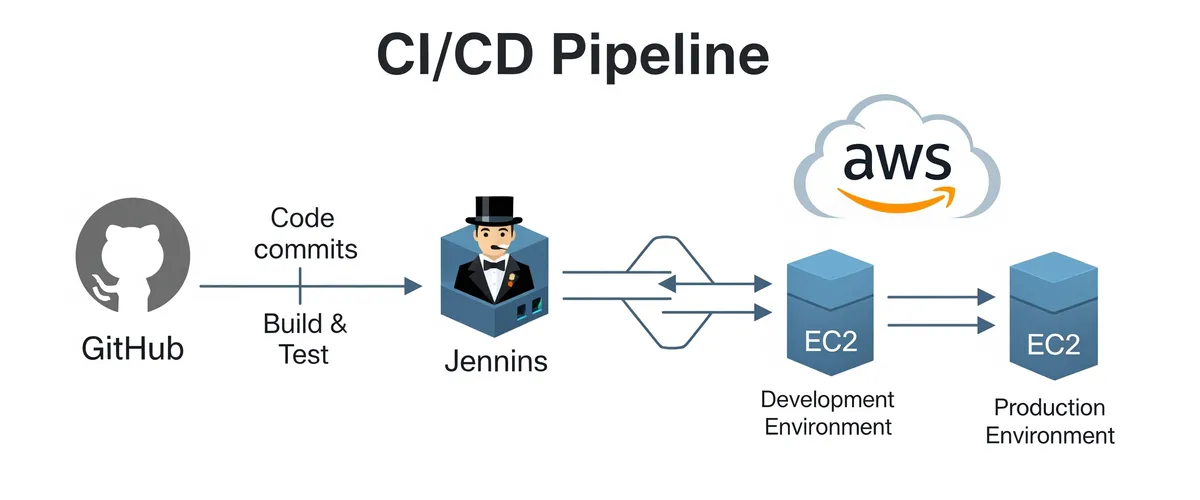
In this post, I will show you how to setup a CI/CD pipeline using Jenkins and Github to deploy a simple PHP application to Devlopment and Production environments on AWS. With this setup, you can deploy your application to AWS with a single click.
Prerequisites
- AWS CLI installed and configured
- IAM user with the following permissions:
- AmazonVPCFullAccess
- AmazonEC2FullAccess
Setup AWS Infrastructure for Devlopment Environment
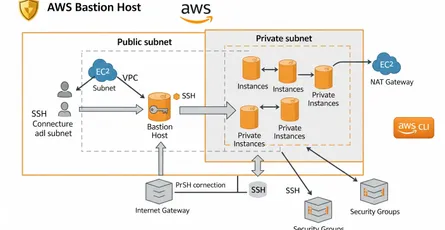
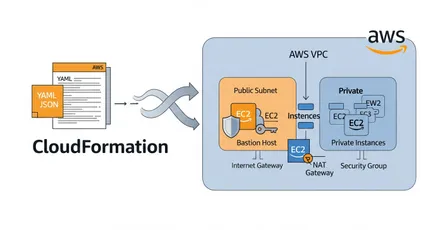
Create VPC
Step 1: Create VPC
To create a VPC, run the following command:
# Create a VPCAWS_VPC=$(aws ec2 create-vpc \ --cidr-block 10.0.0.0/16 \ --query 'Vpc.VpcId' \ --output text)
# Add a name tag to the VPCaws ec2 create-tags \ --resources $AWS_VPC \ --tags Key=Name,Value=environments-vpcStep 2: Modify your custom VPC and enable DNS hostname support, and DNS support
To modify your custom VPC and enable DNS hostname support, and DNS support, run the following command:
# Modify your custom VPC and enable DNS hostname support, and DNS support# Enable DNS hostnamesaws ec2 modify-vpc-attribute \ --vpc-id $AWS_VPC \ --enable-dns-hostnames "{\"Value\":true}"
# Enable DNS supportaws ec2 modify-vpc-attribute \ --vpc-id $AWS_VPC \ --enable-dns-support "{\"Value\":true}"Step 3: Create a Public Subnet
To create a public subnet, run the following command:
# Create a public subnetAWS_PUBLIC_SUBNET=$(aws ec2 create-subnet \ --vpc-id $AWS_VPC \ --cidr-block 10.0.1.0/24 \ --query 'Subnet.SubnetId' \ --output text)
# Add a name tag to the public subnetaws ec2 create-tags \ --resources $AWS_PUBLIC_SUBNET \ --tags Key=Name,Value=environments-public-subnetStep 4: Enable Auto-assign Public IP on the subnet
To enable auto-assign public IP on the subnet, run the following command:
# Enable auto-assign public IP on the subnetaws ec2 modify-subnet-attribute \ --subnet-id $AWS_PUBLIC_SUBNET \ --map-public-ip-on-launchStep 5: Create an Internet Gateway
To create an internet gateway, run the following command:
# Create an Internet GatewayAWS_INTERNET_GATEWAY=$(aws ec2 create-internet-gateway \ --query 'InternetGateway.InternetGatewayId' \ --output text)
# Add a name tag to the Internet Gatewayaws ec2 create-tags \ --resources $AWS_INTERNET_GATEWAY \ --tags Key=Name,Value=environments-internet-gatewayStep 6: Attach the Internet Gateway to your VPC
To attach the internet gateway to your VPC, run the following command:
# Attach the Internet Gateway to the VPCaws ec2 attach-internet-gateway \ --internet-gateway-id $AWS_INTERNET_GATEWAY \ --vpc-id $AWS_VPCStep 7: Create a Route Table
To create a route table, run the following command:
# Create a route tableAWS_ROUTE_TABLE=$(aws ec2 create-route-table \ --vpc-id $AWS_VPC \ --query 'RouteTable.RouteTableId' \ --output text)
# Add a name tag to the route tableaws ec2 create-tags \ --resources $AWS_ROUTE_TABLE \ --tags Key=Name,Value=environments-route-tableStep 8: Create a custom route table association
To create a route in the route table, run the following command:
# Create a custom route table associationaws ec2 associate-route-table \ --subnet-id $AWS_PUBLIC_SUBNET \ --route-table-id $AWS_ROUTE_TABLEStep 9: Associate the subnet with route table, making it a public subnet
To associate the subnet with route table, making it a public subnet, run the following command:
# Associate the subnet with route table, making it a public subnetaws ec2 create-route \ --route-table-id $AWS_ROUTE_TABLE \ --destination-cidr-block 0.0.0.0/0 \ --gateway-id $AWS_INTERNET_GATEWAYStep 10: Create a Security Group
To create a security group, run the following command:
# Create a security groupAWS_SECURITY_GROUP=$(aws ec2 create-security-group \ --group-name aws-security-group \ --description "AWS Security Group" \ --vpc-id $AWS_VPC \ --query 'GroupId' \ --output text)
# Add a name tag to the security groupaws ec2 create-tags \ --resources $AWS_SECURITY_GROUP \ --tags Key=Name,Value=environments-security-groupStep 11: Add inbound rules to the security group
To add inbound rules to the security group, run the following command:
# Add inbound rules to the security group
# Add SSH ruleaws ec2 authorize-security-group-ingress \ --group-id $AWS_SECURITY_GROUP \ --protocol tcp \ --port 22 \ --cidr 0.0.0.0/0 \ --output text
# Add HTTP ruleaws ec2 authorize-security-group-ingress \ --group-id $AWS_SECURITY_GROUP \ --protocol tcp \ --port 80 \ --cidr 0.0.0.0/0 \ --output text
# Add HTTPS ruleaws ec2 authorize-security-group-ingress \ --group-id $AWS_SECURITY_GROUP \ --protocol tcp \ --port 443 \ --cidr 0.0.0.0/0 \ --output textCreate a Two EC2 Instances
Step 1: Get the latest AMI ID for Amazon Linux 2
To get the latest AMI ID for Amazon Linux 2, run the following command:
# Get the latest AMI ID for Amazon Linux 2AWS_AMI=$(aws ec2 describe-images \ --owners 'amazon' \ --filters 'Name=name,Values=amzn2-ami-hvm-2.0.*' \ 'Name=state,Values=available' \ --query 'sort_by(Images, &CreationDate)[-1].[ImageId]' \ --output 'text')Step 2: Create a Key Pair
To create a key pair, run the following command:
# Create a key pairaws ec2 create-key-pair \ --key-name aws-key-pair \ --query 'KeyMaterial' \ --output text > aws-key-pair.pem
# Change the permission of the key pairchmod 400 aws-key-pair.pemStep 3: Create a user data script
To create a user data script, run the following command:
# Create a userdata scriptcat <<EOF > userdata.sh#!/bin/bash
# update the systemsudo yum update -y
# install httpdsudo yum install -y httpd
# start httpdsudo systemctl start httpd
# enable httpdsudo systemctl enable httpd
# at first, we will enable amazon-linux-extras so that we can specify the PHP version that we want to install.sudo amazon-linux-extras enable php7.4 -y
# install phpsudo yum install -y php php-{pear,cgi,common,curl,mbstring,gd,mysqlnd,gettext,bcmath,json,xml,fpm,intl,zip,imap}
# install MariaDBsudo yum install -y mariadb-server
# start MariaDBsudo systemctl start mariadb
# enable MariaDBsudo systemctl enable mariadb
# we will now secure MariaDB.sudo mysql_secure_installation <<EOF2y121612121612yyyyEOF2
# change the ownership of the /var/www directory to the apache user and group.sudo chown -R apache:apache /var/www
# this will give read, write, and execute permissions to the owner, group, and others.sudo chmod -R 775 /var/www
# this is for the wp-config.php filesudo chmod -R 755 /var/www/html
# restart MariaDBsudo systemctl restart mariadb
# restart httpdsudo systemctl restart httpdEOFStep 4: Create an EC2 instance
To create an EC2 instance, run the following command:
# Create an EC2 InstanceAWS_EC2_INSTANCE_PROD=$(aws ec2 run-instances \ --image-id $AWS_AMI \ --count 1 \ --instance-type t2.micro \ --key-name aws-key-pair \ --security-group-ids $AWS_SECURITY_GROUP \ --subnet-id $AWS_PUBLIC_SUBNET \ --user-data file://userdata.sh \ --query 'Instances[0].InstanceId' \ --output text)
AWS_EC2_INSTANCE_DEV=$(aws ec2 run-instances \ --image-id $AWS_AMI \ --count 1 \ --instance-type t2.micro \ --key-name aws-key-pair \ --security-group-ids $AWS_SECURITY_GROUP \ --subnet-id $AWS_PUBLIC_SUBNET \ --user-data file://userdata.sh \ --query 'Instances[0].InstanceId' \ --output text)
# Add a name tag to the EC2 Instanceaws ec2 create-tags \ --resources $AWS_EC2_INSTANCE_PROD \ --tags Key=Name,Value=environments-prod
aws ec2 create-tags \ --resources $AWS_EC2_INSTANCE_DEV \ --tags Key=Name,Value=environments-devStep 5: Create an Elastic IP
To create an Elastic IP, run the following command:
# Create an Elastic IPAWS_ELASTIC_IP_PROD=$(aws ec2 allocate-address \ --domain vpc \ --query 'AllocationId' \ --output text)
AWS_ELASTIC_IP_DEV=$(aws ec2 allocate-address \ --domain vpc \ --query 'AllocationId' \ --output text)
# Add a name tag to the Elastic IPaws ec2 create-tags \ --resources $AWS_ELASTIC_IP_PROD \ --tags Key=Name,Value=environments-prod
aws ec2 create-tags \ --resources $AWS_ELASTIC_IP_DEV \ --tags Key=Name,Value=environments-devStep 6: Associate the Elastic IP with the EC2 Instance
To associate the Elastic IP with the EC2 Instance, run the following command:
# Associate the Elastic IP with the EC2 Instanceaws ec2 associate-address \ --instance-id $AWS_EC2_INSTANCE_PROD \ --allocation-id $AWS_ELASTIC_IP_PROD
aws ec2 associate-address \ --instance-id $AWS_EC2_INSTANCE_DEV \ --allocation-id $AWS_ELASTIC_IP_DEVStep 7: Get the Public IP Address of the EC2 Instance
To get the public IP address of the EC2 Instance, run the following command:
# Get the public IP address of the EC2 InstanceAWS_PUBLIC_IP_PROD=$(aws ec2 describe-instances \ --instance-ids $AWS_EC2_INSTANCE_PROD \ --query 'Reservations[0].Instances[0].PublicIpAddress' \ --output text)
AWS_PUBLIC_IP_DEV=$(aws ec2 describe-instances \ --instance-ids $AWS_EC2_INSTANCE_DEV \ --query 'Reservations[0].Instances[0].PublicIpAddress' \ --output text)Setup Simple PHP Application
Create a GitHub Repository
Step 1: Create a GitHub repository
To create a GitHub repository, run the following command:
# Create a GitHub repositorycurl -u $GITHUB_USERNAME https://api.github.com/user/repos -d '{"name":"quick-test-jenkins"}'or you can create a repository from the GitHub website, go to Create a new repository and create a new repository.
- Repository name: quick-test-jenkins
- Description: Quick Test Jenkins
- Public/Private: Private
- Initialize this repository with a README: No
- Add .gitignore: None
- Add a license: None
Step 2: Clone the GitHub repository
To clone the GitHub repository, run the following command:
# Clone the GitHub repository
# Change directorycd quick-test-jenkinsStep 3: Create a new branch
To create a new branch, run the following command:
# Create a new branchgit checkout -b devlopmentCreate a Simple PHP Application
Step 1: Create the structure of the application
To create the structure of the application, run the following command:
# Create the structure of the applicationmkdir -p app/{config,controllers,views} assets/{css}Step 2: Create the env.php file
To create the config.php file, run the following command:
<?php
// Define the environmentdefine('URL', $_SERVER['HTTP_HOST']);define('DEV_DNS', 'DEVLOPMENT_DNS');define('PROD_DNS', 'PRODUCTION_DNS');define('DEV', 'DEVLOPMENT_IP');define('PROD', 'PRODUCTION_IP');
// check the environmentif (URL == PROD_DNS || URL == PROD) { define('ENV', 'PROD');} elseif (URL == DEV_DNS || URL == DEV) { define('ENV', 'DEV');} else { define('ENV', 'LOCAL');}
// Define the databaseswitch (ENV) { case 'PROD': define( 'DB_NAME', 'PROD_PHP'); define( 'DB_USER', 'PROD_USER' ); define( 'DB_PASSWORD', '161216' ); define( 'DB_HOST', 'localhost' ); break; case 'DEV': define( 'DB_NAME', 'DEV_PHP'); define( 'DB_USER', 'DEV_USER' ); define( 'DB_PASSWORD', '121612' ); define( 'DB_HOST', 'localhost' ); break; default: define( 'DB_NAME', ''); define( 'DB_USER', '' ); define( 'DB_PASSWORD', '' ); define( 'DB_HOST', '' ); break;}Step 3: Create the connection.php file
To create the connection.php file, run the following command:
<?php
// Include the env.php filerequire_once 'env.php';
// Create a connection to the databasetry { $conn = new PDO("mysql:host=".DB_HOST.";dbname=".DB_NAME, DB_USER, DB_PASSWORD); $conn->setAttribute(PDO::ATTR_ERRMODE, PDO::ERRMODE_EXCEPTION);} catch (PDOException $e) { echo "Connection failed: " . $e->getMessage();}Step 4: Create the controller file
To create the controller file, run the following command:
<?php
// Include the connection.php filerequire_once 'app/config/connection.php';
// Get the data from the database$query = "SELECT * FROM `users`";$stmt = $conn->prepare($query);$stmt->execute();$users = $stmt->fetchAll(PDO::FETCH_ASSOC);
// close the connection$conn = null;Step 5: Create the view file
To create the view file, run the following command:
<!DOCTYPE html><html> <head> <meta charset="utf-8" /> <meta name="viewport" content="width=device-width, initial-scale=1" /> <title><?php echo ENV; ?> | My Site</title> <link rel="stylesheet" href="./assets/css/normalize.css" /> <link rel="stylesheet" href="./assets/css/main.css" /> </head> <body> <header> <h1>My Site</h1>
<nav> <ul> <li><a href="./index.php">Home</a></li> </ul> </nav> </header>
<main> <h2>Home</h2> <p>Welcome to my site!</p> <p> <?php echo "Environment: " . ENV; ?> </p> </main>
<footer> <p>My Site © 2022</p> </footer> </body></html>Step 6: Create the index.php file
To create the index.php file, run the following command:
<?php
// Include the controller filerequire_once 'app/controllers/index.php';
// Include the view filerequire_once 'app/views/index.php';Step 7: Create the normalize.css file
To create the normalize.css file, run the following command:
Click to see the code of the normalize.css file
/*! normalize.css v8.0.1 | MIT License | github.com/necolas/normalize.css */
/* Document ========================================================================== */
/** * 1. Correct the line height in all browsers. * 2. Prevent adjustments of font size after orientation changes in iOS. */
html { line-height: 1.15; /* 1 */ -webkit-text-size-adjust: 100%; /* 2 */}
/* Sections ========================================================================== */
/** * Remove the margin in all browsers. */
body { margin: 0;}
/** * Render the `main` element consistently in IE. */
main { display: block;}
/** * Correct the font size and margin on `h1` elements within `section` and * `article` contexts in Chrome, Firefox, and Safari. */
h1 { font-size: 2em; margin: 0.67em 0;}
/* Grouping content ========================================================================== */
/** * 1. Add the correct box sizing in Firefox. * 2. Show the overflow in Edge and IE. */
hr { box-sizing: content-box; /* 1 */ height: 0; /* 1 */ overflow: visible; /* 2 */}
/** * 1. Correct the inheritance and scaling of font size in all browsers. * 2. Correct the odd `em` font sizing in all browsers. */
pre { font-family: monospace, monospace; /* 1 */ font-size: 1em; /* 2 */}
/* Text-level semantics ========================================================================== */
/** * Remove the gray background on active links in IE 10. */
a { background-color: transparent;}
/** * 1. Remove the bottom border in Chrome 57- * 2. Add the correct text decoration in Chrome, Edge, IE, Opera, and Safari. */
abbr[title] { border-bottom: none; /* 1 */ text-decoration: underline; /* 2 */ text-decoration: underline dotted; /* 2 */}
/** * Add the correct font weight in Chrome, Edge, and Safari. */
b,strong { font-weight: bolder;}
/** * 1. Correct the inheritance and scaling of font size in all browsers. * 2. Correct the odd `em` font sizing in all browsers. */
code,kbd,samp { font-family: monospace, monospace; /* 1 */ font-size: 1em; /* 2 */}
/** * Add the correct font size in all browsers. */
small { font-size: 80%;}
/** * Prevent `sub` and `sup` elements from affecting the line height in * all browsers. */
sub,sup { font-size: 75%; line-height: 0; position: relative; vertical-align: baseline;}
sub { bottom: -0.25em;}
sup { top: -0.5em;}
/* Embedded content ========================================================================== */
/** * Remove the border on images inside links in IE 10. */
img { border-style: none;}
/* Forms ========================================================================== */
/** * 1. Change the font styles in all browsers. * 2. Remove the margin in Firefox and Safari. */
button,input,optgroup,select,textarea { font-family: inherit; /* 1 */ font-size: 100%; /* 1 */ line-height: 1.15; /* 1 */ margin: 0; /* 2 */}
/** * Show the overflow in IE. * 1. Show the overflow in Edge. */
button,input { /* 1 */ overflow: visible;}
/** * Remove the inheritance of text transform in Edge, Firefox, and IE. * 1. Remove the inheritance of text transform in Firefox. */
button,select { /* 1 */ text-transform: none;}
/** * Correct the inability to style clickable types in iOS and Safari. */
button,[type="button"],[type="reset"],[type="submit"] { -webkit-appearance: button;}
/** * Remove the inner border and padding in Firefox. */
button::-moz-focus-inner,[type="button"]::-moz-focus-inner,[type="reset"]::-moz-focus-inner,[type="submit"]::-moz-focus-inner { border-style: none; padding: 0;}
/** * Restore the focus styles unset by the previous rule. */
button:-moz-focusring,[type="button"]:-moz-focusring,[type="reset"]:-moz-focusring,[type="submit"]:-moz-focusring { outline: 1px dotted ButtonText;}
/** * Correct the padding in Firefox. */
fieldset { padding: 0.35em 0.75em 0.625em;}
/** * 1. Correct the text wrapping in Edge and IE. * 2. Correct the color inheritance from `fieldset` elements in IE. * 3. Remove the padding so developers are not caught out when they zero out * `fieldset` elements in all browsers. */
legend { box-sizing: border-box; /* 1 */ color: inherit; /* 2 */ display: table; /* 1 */ max-width: 100%; /* 1 */ padding: 0; /* 3 */ white-space: normal; /* 1 */}
/** * Add the correct vertical alignment in Chrome, Firefox, and Opera. */
progress { vertical-align: baseline;}
/** * Remove the default vertical scrollbar in IE 10+. */
textarea { overflow: auto;}
/** * 1. Add the correct box sizing in IE 10. * 2. Remove the padding in IE 10. */
[type="checkbox"],[type="radio"] { box-sizing: border-box; /* 1 */ padding: 0; /* 2 */}
/** * Correct the cursor style of increment and decrement buttons in Chrome. */
[type="number"]::-webkit-inner-spin-button,[type="number"]::-webkit-outer-spin-button { height: auto;}
/** * 1. Correct the odd appearance in Chrome and Safari. * 2. Correct the outline style in Safari. */
[type="search"] { -webkit-appearance: textfield; /* 1 */ outline-offset: -2px; /* 2 */}
/** * Remove the inner padding in Chrome and Safari on macOS. */
[type="search"]::-webkit-search-decoration { -webkit-appearance: none;}
/** * 1. Correct the inability to style clickable types in iOS and Safari. * 2. Change font properties to `inherit` in Safari. */
::-webkit-file-upload-button { -webkit-appearance: button; /* 1 */ font: inherit; /* 2 */}
/* Interactive ========================================================================== */
/* * Add the correct display in Edge, IE 10+, and Firefox. */
details { display: block;}
/* * Add the correct display in all browsers. */
summary { display: list-item;}
/* Misc ========================================================================== */
/** * Add the correct display in IE 10+. */
template { display: none;}
/** * Add the correct display in IE 10. */
[hidden] { display: none;}Step 8: Create the main.css file
To create the main.css file, run the following command:
Click to expand the code of the main.css file
* { box-sizing: border-box; padding: 0; margin: 0;}
html { scroll-behavior: smooth; font-size: 62.5%;}
body { font-family: "Roboto", sans-serif; font-size: 1.6rem; line-height: 1.6; color: #333;}
header { display: flex; justify-content: space-around; align-items: center; background-color: #333; color: #fff; height: 10rem;}
header > nav { display: flex; justify-content: space-around; align-items: center; width: 50%;}
header > nav > ul { display: flex; justify-content: space-around; align-items: center; width: 100%;}
header > nav > ul > li { list-style: none;}
header > nav > ul > li > a { text-decoration: none; color: #fff;}
main { display: flex; justify-content: center; align-items: center; flex-direction: column; height: 70vh;}
main > h1 { font-size: 5rem; margin-bottom: 2rem;}
main > p { font-size: 2rem; margin-bottom: 2rem;}
footer { display: flex; justify-content: center; align-items: center; height: 10rem; background-color: #333; color: #fff;}Step 8: Add the files to the GitHub repository
To add the files to the GitHub repository, run the following command:
# Add the files to the GitHub repositorygit add .
# Commit the files to the GitHub repositorygit commit -m "build: add the files to the GitHub repository"
# Push the files to the GitHub repositorygit push origin devlopmentCreate a Jenkins Pipeline
Step 1: Create a new Jenkins pipeline
To create a new Jenkins pipeline, run the following command:
# Create a new Jenkins pipelinetouch JenkinsfileStep 2: Add the code to the Jenkins pipeline
To add the code to the Jenkins pipeline, run the following command:
pipeline { agent any environment { AWS_PUBLIC_IP_DEV = 'AWS_PUBLIC_IP_DEV' }
stages { stage('Deploy to Development') { steps { sh ''' # remove the files ssh -i "/var/lib/jenkins/.ssh/aws-key-pair.pem" -o StrictHostKeyChecking=no ec2-user@${AWS_PUBLIC_IP_DEV} "sudo rm -rf /var/www/html/*" # copy the files to the dev server scp -i "/var/lib/jenkins/.ssh/aws-key-pair.pem" -o StrictHostKeyChecking=no -r ./* ec2-user@${AWS_PUBLIC_IP_DEV}:/var/www/html # restart the apache server ssh -i "/var/lib/jenkins/.ssh/aws-key-pair.pem" -o StrictHostKeyChecking=no ec2-user@${AWS_PUBLIC_IP_DEV} "sudo systemctl restart httpd" ''' } } }}Step 3: Add the files to the GitHub repository
To add the files to the GitHub repository, run the following command:
# Add the files to the GitHub repositorygit add .
# Commit the files to the GitHub repositorygit commit -m "build: add the jenkins pipeline to the GitHub repository"
# Push the files to the GitHub repositorygit push origin devlopmentCreate a Jenkins Job
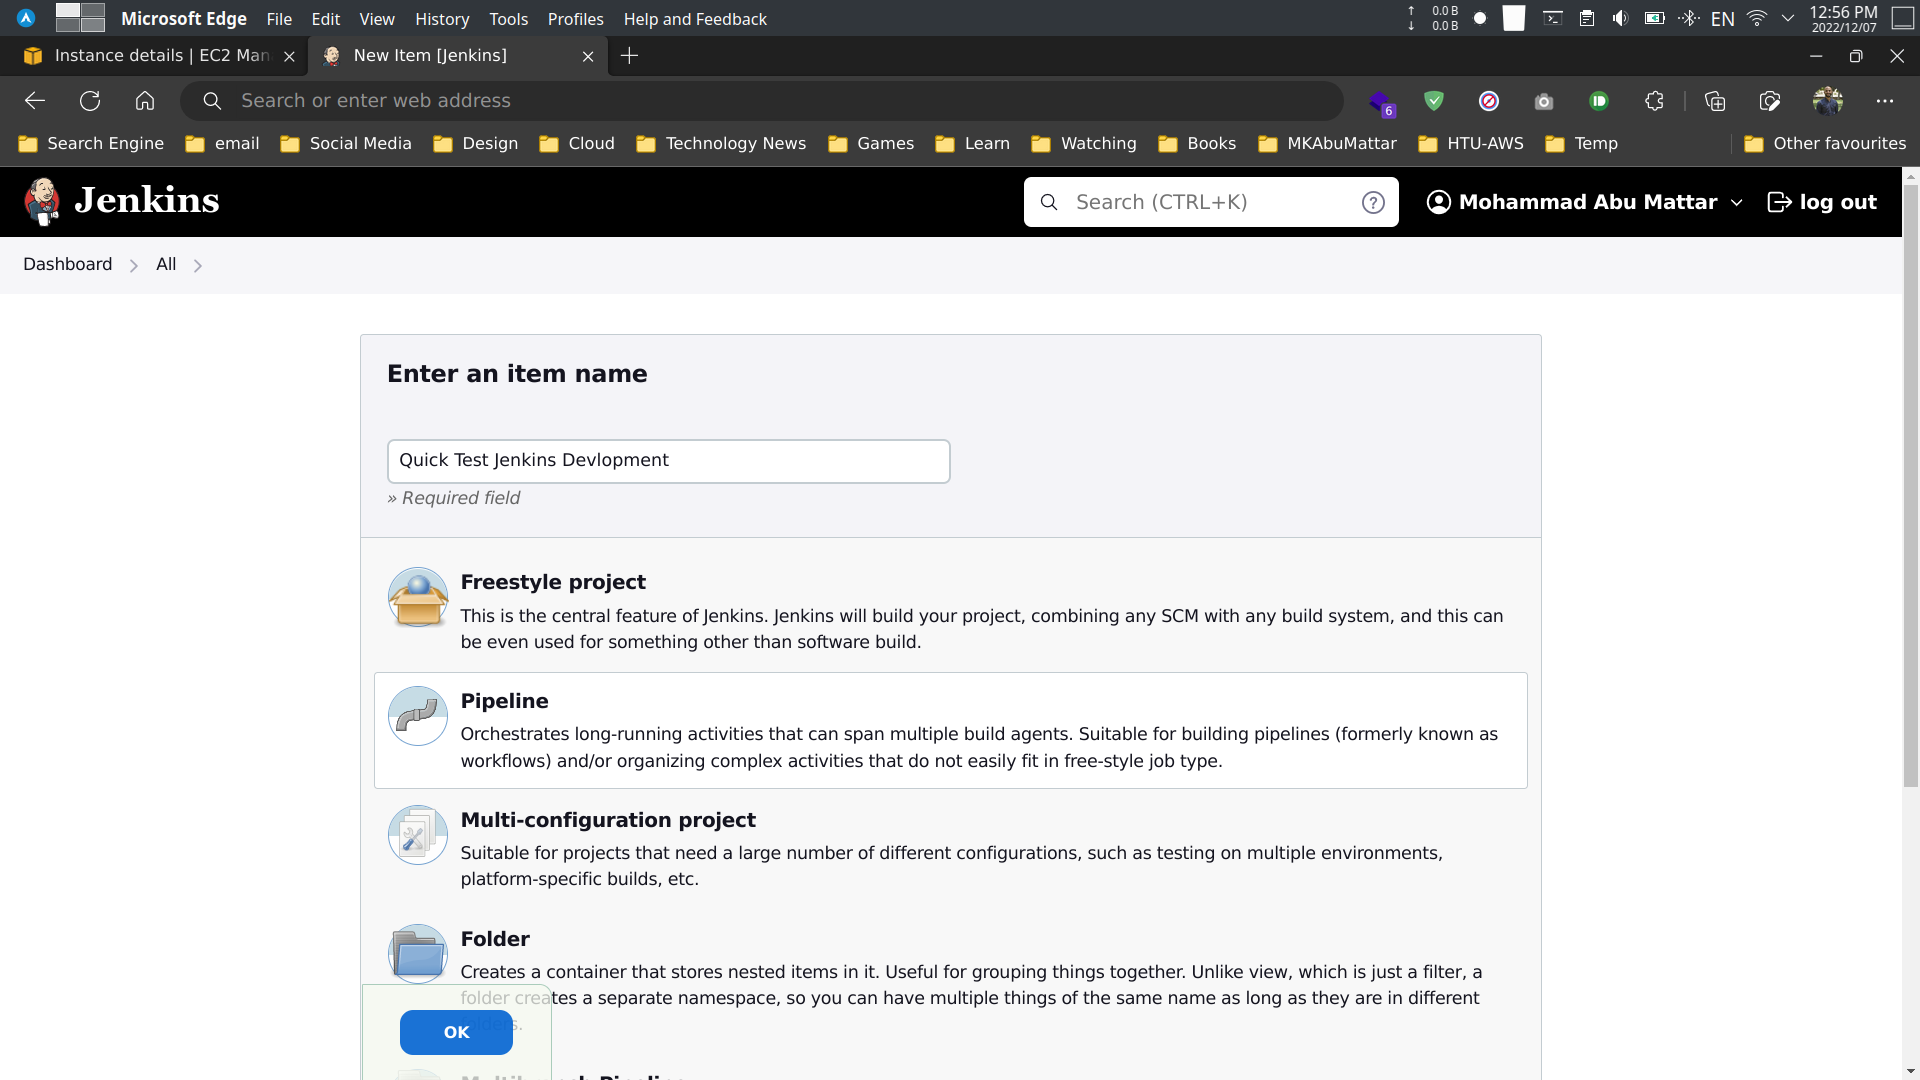
Step 1: Create a new Jenkins job
- Open the Jenkins dashboard at EC2 instance from previous blog post. Go to
http://<public-ip-address>:8080/and login with the credentials you created in the previous blog post.

- Click on
New Itemand enter the name of the job. SelectPipelineand click onOK.
- Name:
Quick Test Jenkins Devlopment - Select:
Pipeline - Click on:
OK
- Configure the job.
- Description:
Quick Test Jenkins Devlopment - Select:
Pipeline- Definition:
Pipeline script from SCM - SCM:
Git- Repository URL:
https://github.com/MKAbuMattar/quick-test-jenkins.git - Credentials:
Add>Jenkins>Global credentials (unrestricted)>Add Credentials>Username with password>Kind: Username with password>Username: <your-github-username>>Password: <your-github-password>>ID: <your-github-username>>Description: <your-github-username>>OK>OK>OK - Branches to build:
*/devlopment
- Repository URL:
- Definition:
- Click on:
Save
Note: How to Add Git Credentials in Jenkins for private repositories on GitHub

Step 2: Build the Jenkins job
Before building the Jenkins job, you need to add the key pair to the Jenkins server.
- Connect to the Jenkins server using SSH.
# Connect to the Jenkins server using SSHssh -i "<path-to-key-pair>" ec2-user@<public-ip-address>- Login to the Jenkins server.
# Login to the Jenkins serversudo -su jenkins- Create a
.sshdirectory.
# Create a .ssh directorymkdir .ssh
# Change the directorycd .ssh- Create a
aws-key-pair.pemfile.
# Create a aws-key-pair.pem filecat > aws-key-pair.pem << EOF-----BEGIN RSA PRIVATE KEY-----copy the private key from the key pair-----END RSA PRIVATE KEY-----EOF- Change the permission of the
aws-key-pair.pemfile.
# Change the permission of the aws-key-pair.pem filechmod 400 aws-key-pair.pem- Exit the Jenkins server.
# Exit the Jenkins serverexit- Click on
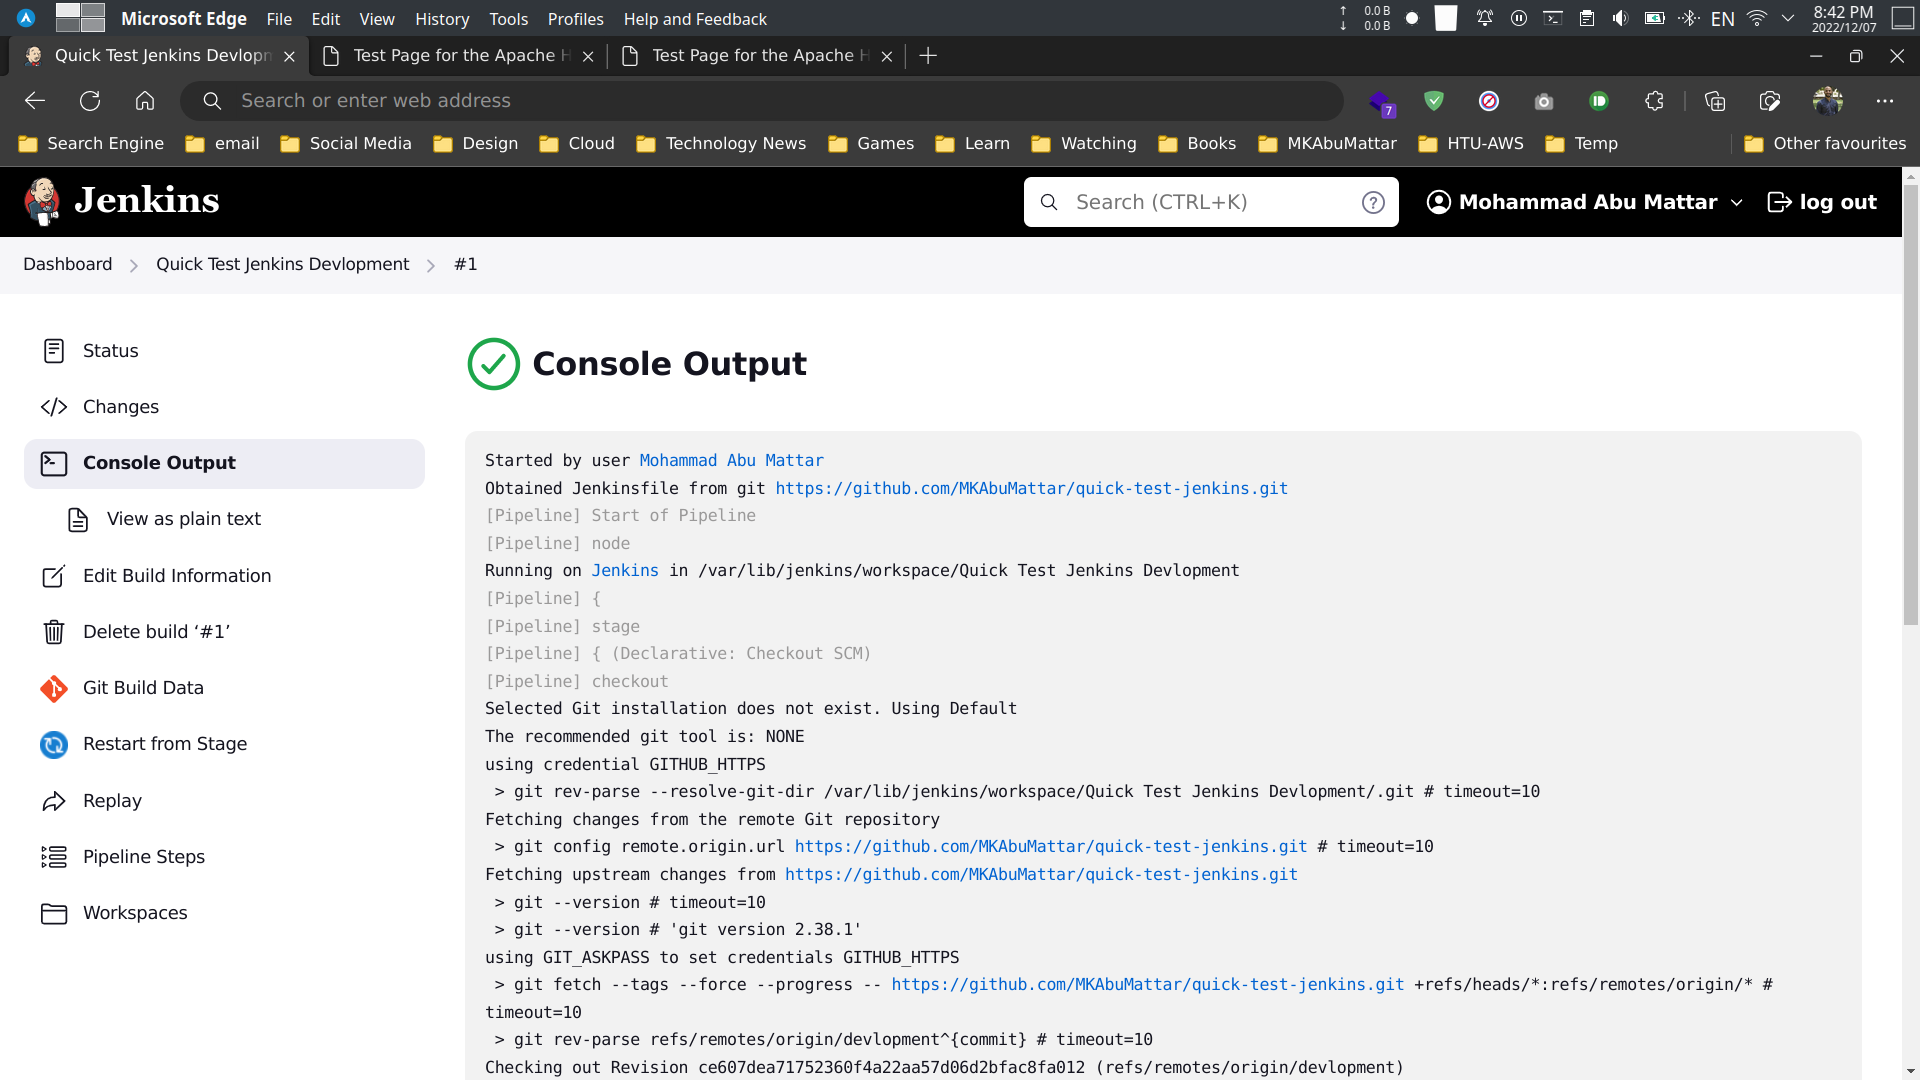
Build Nowto build the Jenkins job.

- Click on
Console Outputto see the build logs.
Step 3: Build the Jenkins job Automatically on GitHub push
- Go to
GitHub> go toquick-test-jenkinsrepository- Click on
Settings- Click on
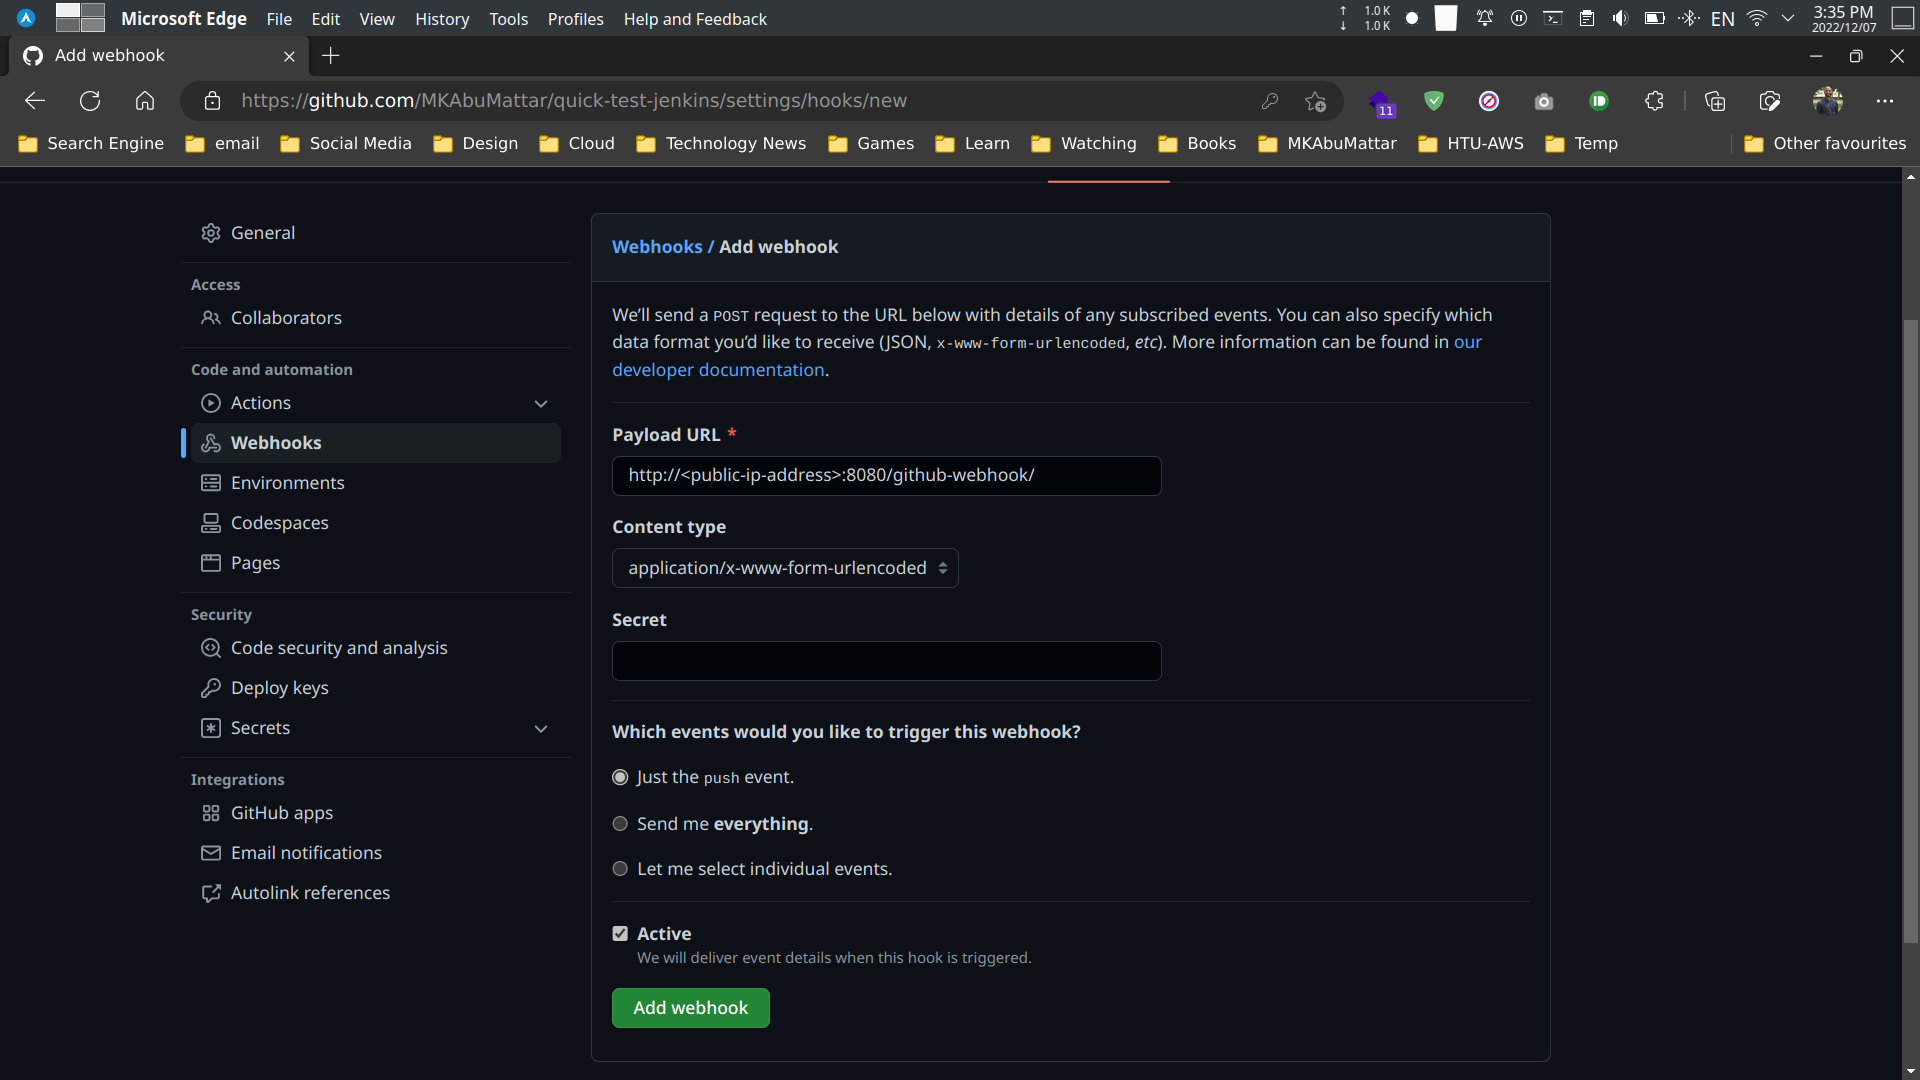
Webhooks- Click on
Add webhook- Payload URL:
http://<public-ip-address>:8080/github-webhook/ - Content type:
application/x-www-form-urlencoded - Which events would you like to trigger this webhook?:
Just the push event. - Active:
Yes - Click on:
Add webhook
- Payload URL:
- Click on
- Click on
- Click on
- Go to
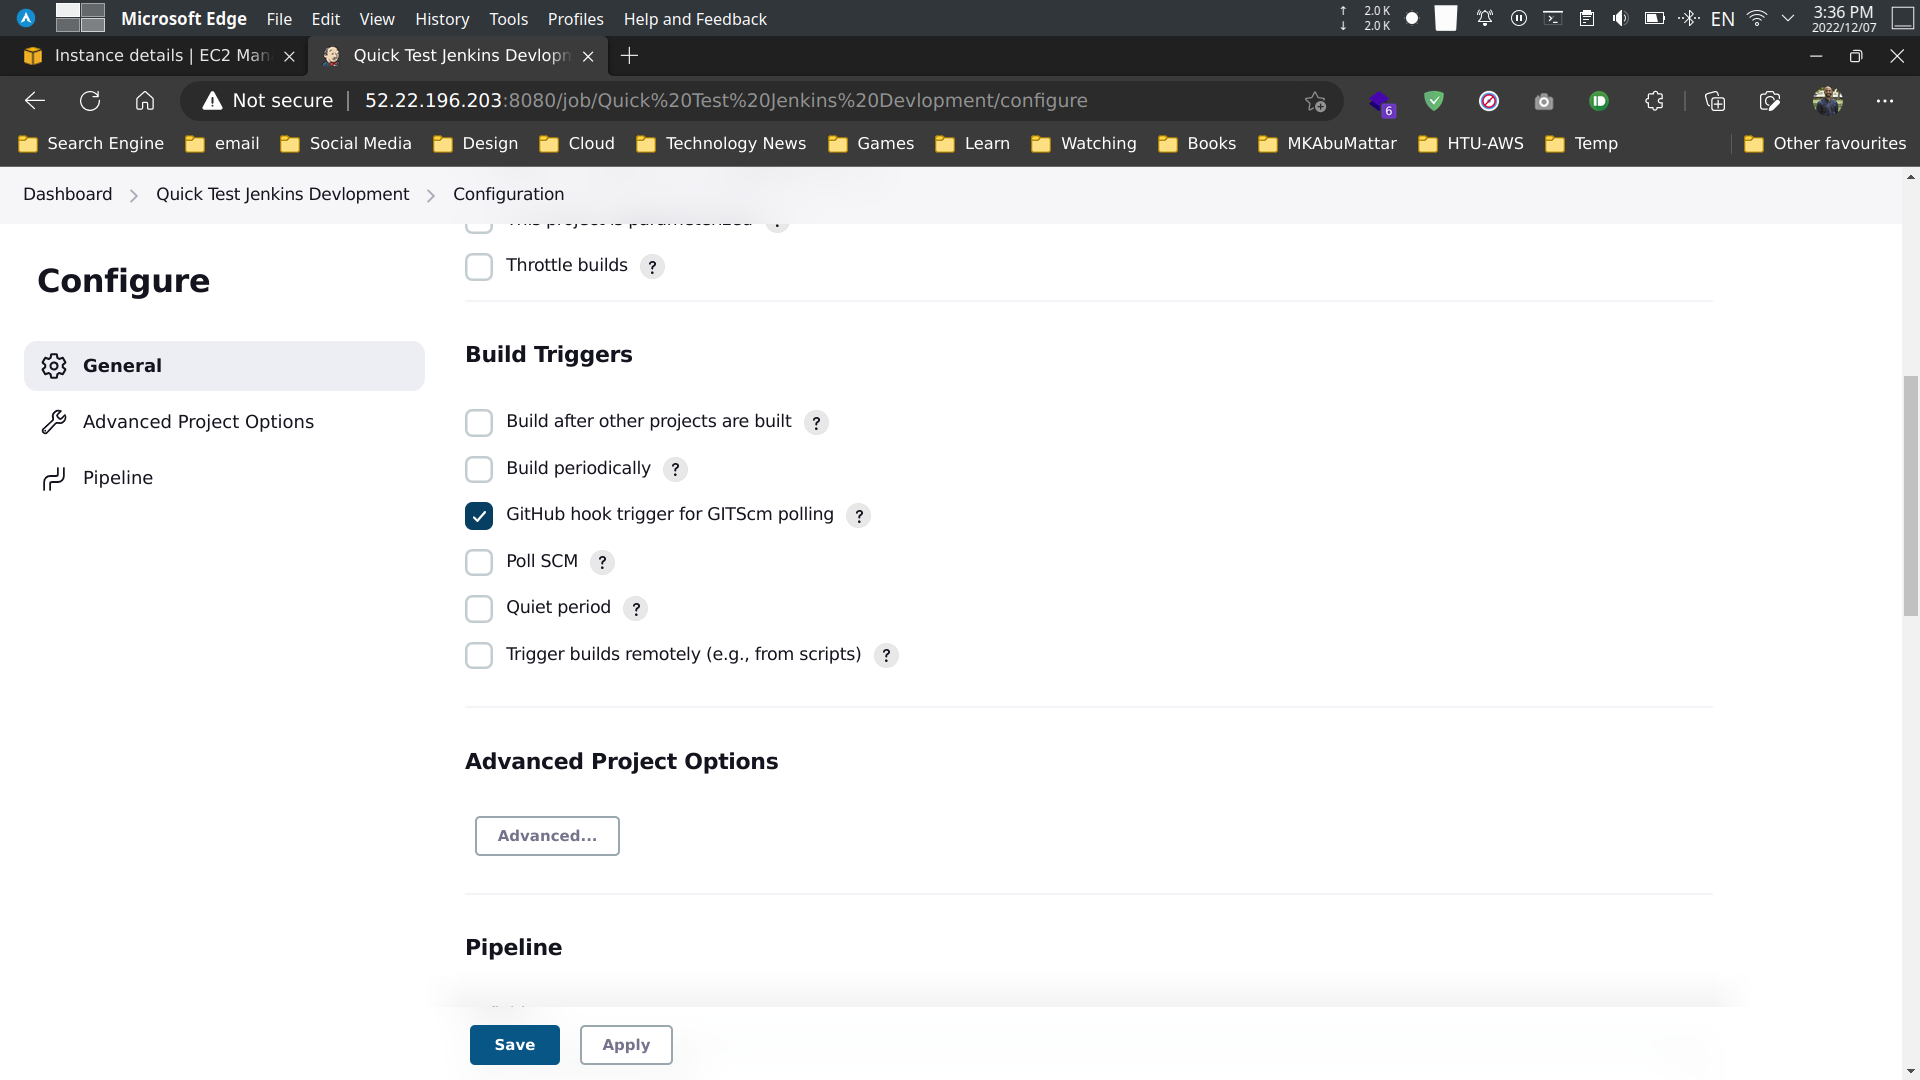
Jenkins>Quick Test Jenkins Devlopmentjob- Click on
Configure- Select:
GitHub hook trigger for GITScm polling - Click on:
Save
- Select:
- Click on
Step 4: Test the Jenkins job Automatically on GitHub push
We’ll add new files to the devlopment branch and push them to the GitHub repository.
<!DOCTYPE html><html> <head> <meta charset="utf-8" /> <meta name="viewport" content="width=device-width, initial-scale=1" /> <title><?php echo ENV; ?> | My Site</title> <link rel="stylesheet" href="./assets/css/normalize.css" /> <link rel="stylesheet" href="./assets/css/main.css" /> </head> <body> <header> <h1>My Site</h1>
<nav> <ul> <li><a href="./index.php">Home</a></li> <li><a href="./table.php">Table</a></li> </ul> </nav> </header>
<main> <h2>Home</h2> <p>Welcome to my site!</p> <p> <?php echo "Environment: " . ENV; ?> </p>
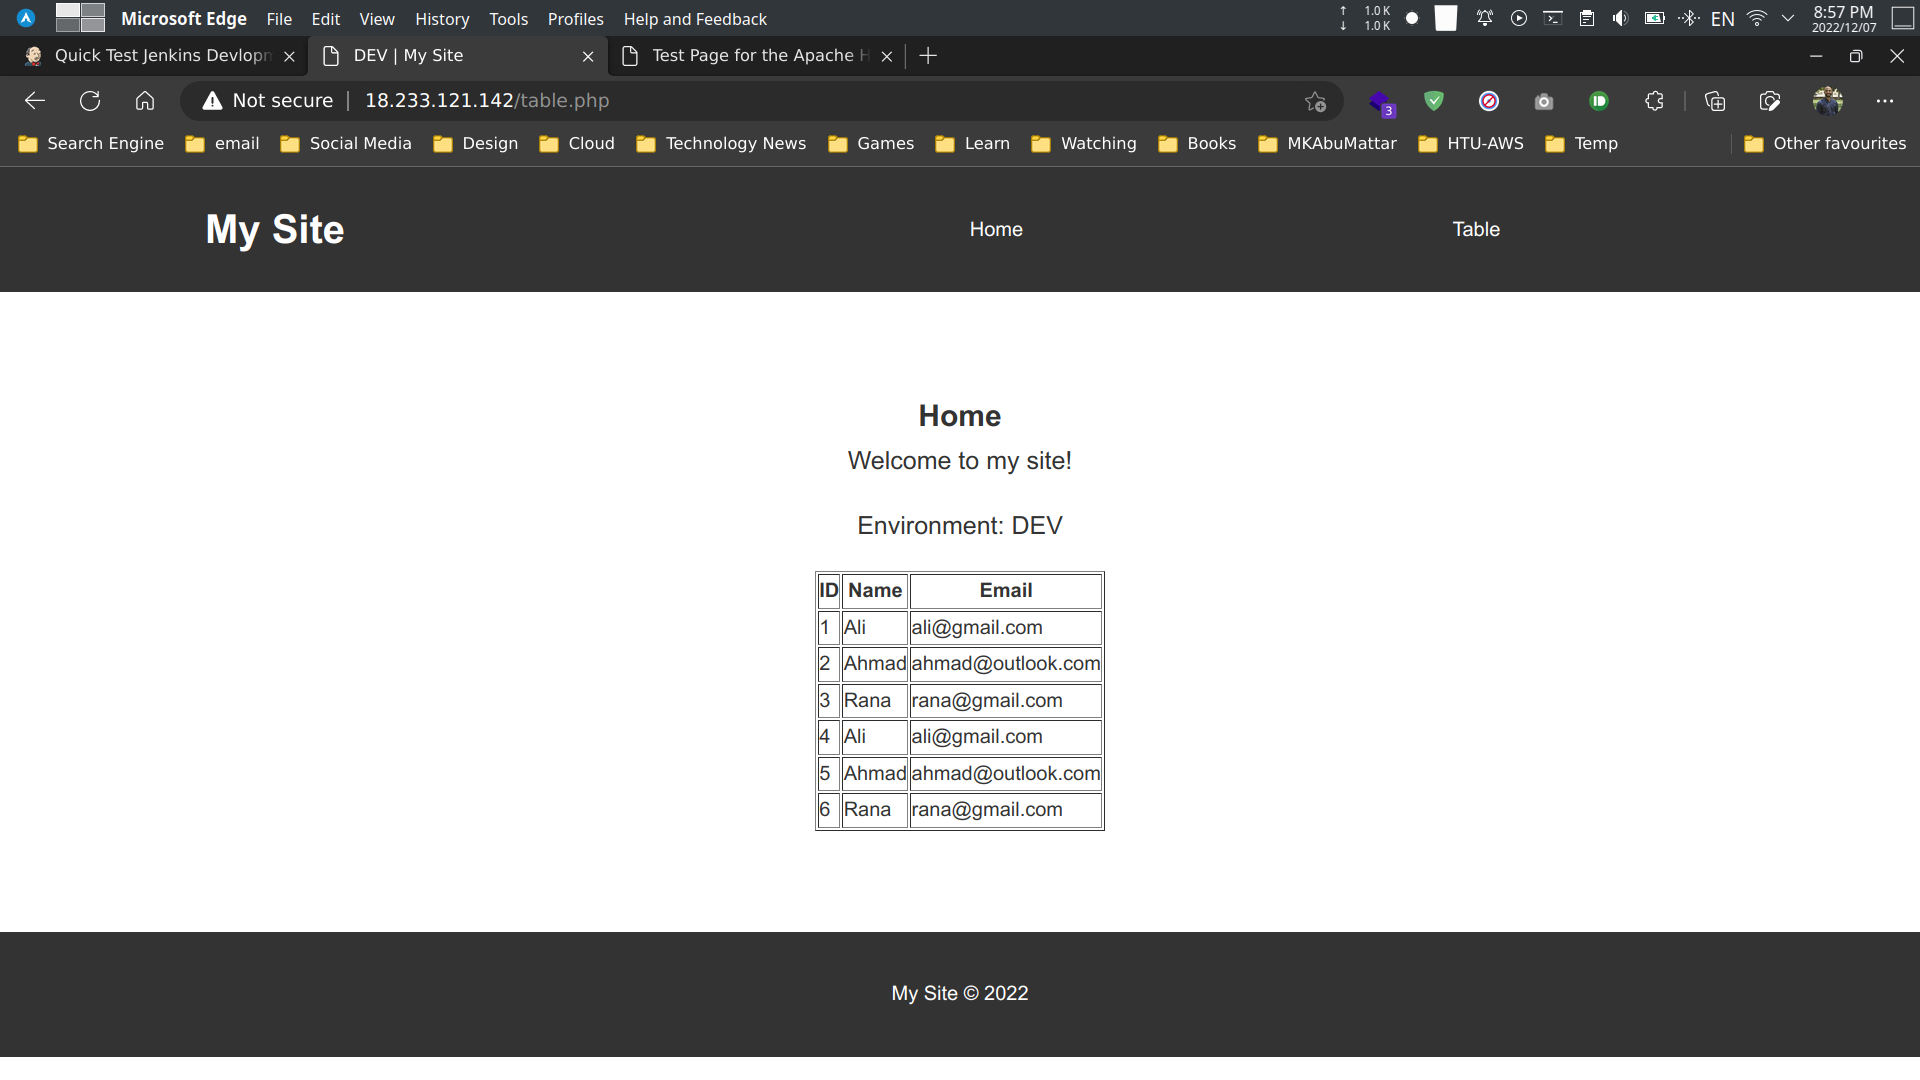
<table border="1"> <thead> <tr> <th>ID</th> <th>Name</th> <th>Email</th> </tr> </thead> <tbody> <?php foreach ($users as $user) : ?> <tr> <td><?php echo $user['id']; ?></td> <td><?php echo $user['name']; ?></td> <td><?php echo $user['email']; ?></td> </tr> <?php endforeach; ?> </tbody> </table> </main>
<footer> <p>My Site © 2022</p> </footer> </body></html><!DOCTYPE html><html> <head> <meta charset="utf-8" /> <meta name="viewport" content="width=device-width, initial-scale=1" /> <title><?php echo ENV; ?> | My Site</title> <link rel="stylesheet" href="./assets/css/normalize.css" /> <link rel="stylesheet" href="./assets/css/main.css" /> </head> <body> <header> <h1>My Site</h1>
<nav> <ul> <li><a href="./index.php">Home</a></li> <li><a href="./table.php">Table</a></li> </ul> </nav> </header>
<main> <h2>Home</h2> <p>Welcome to my site!</p> <p> <?php echo "Environment: " . ENV; ?> </p> </main>
<footer> <p>My Site © 2022</p> </footer> </body></html><?php
// Include the controller filerequire_once 'app/controllers/index.php';
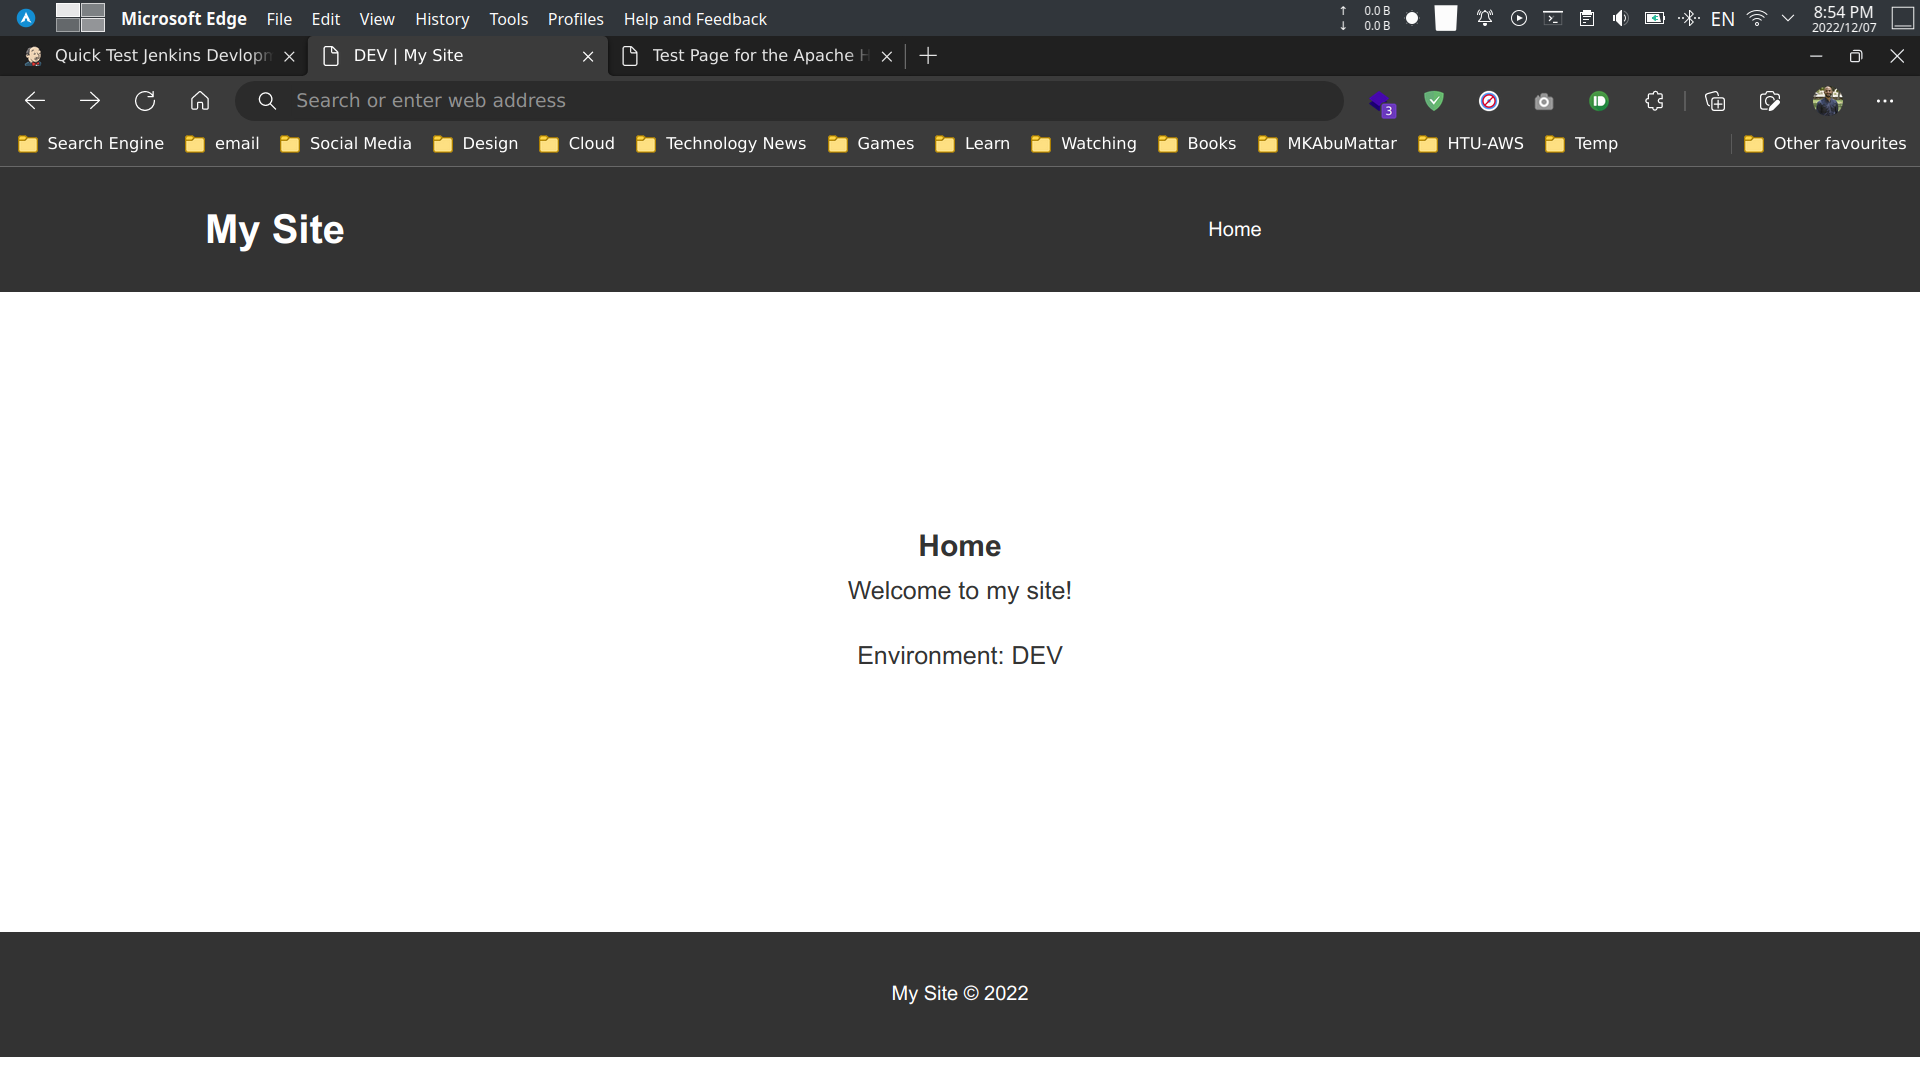
// Include the view filerequire_once 'app/views/tabs.php';Before we push the files to the GitHub repository, we’ll open the EC2 instance in the browser to see the changes.
# Add the files to the GitHub repositorygit add .
# Commit the files to the GitHub repositorygit commit -m "build: test the Jenkins job Automatically on GitHub push"
# Push the files to the GitHub repositorygit push origin devlopment
- Go to
Jenkins>Quick Test Jenkins Devlopmentjob >Build History.
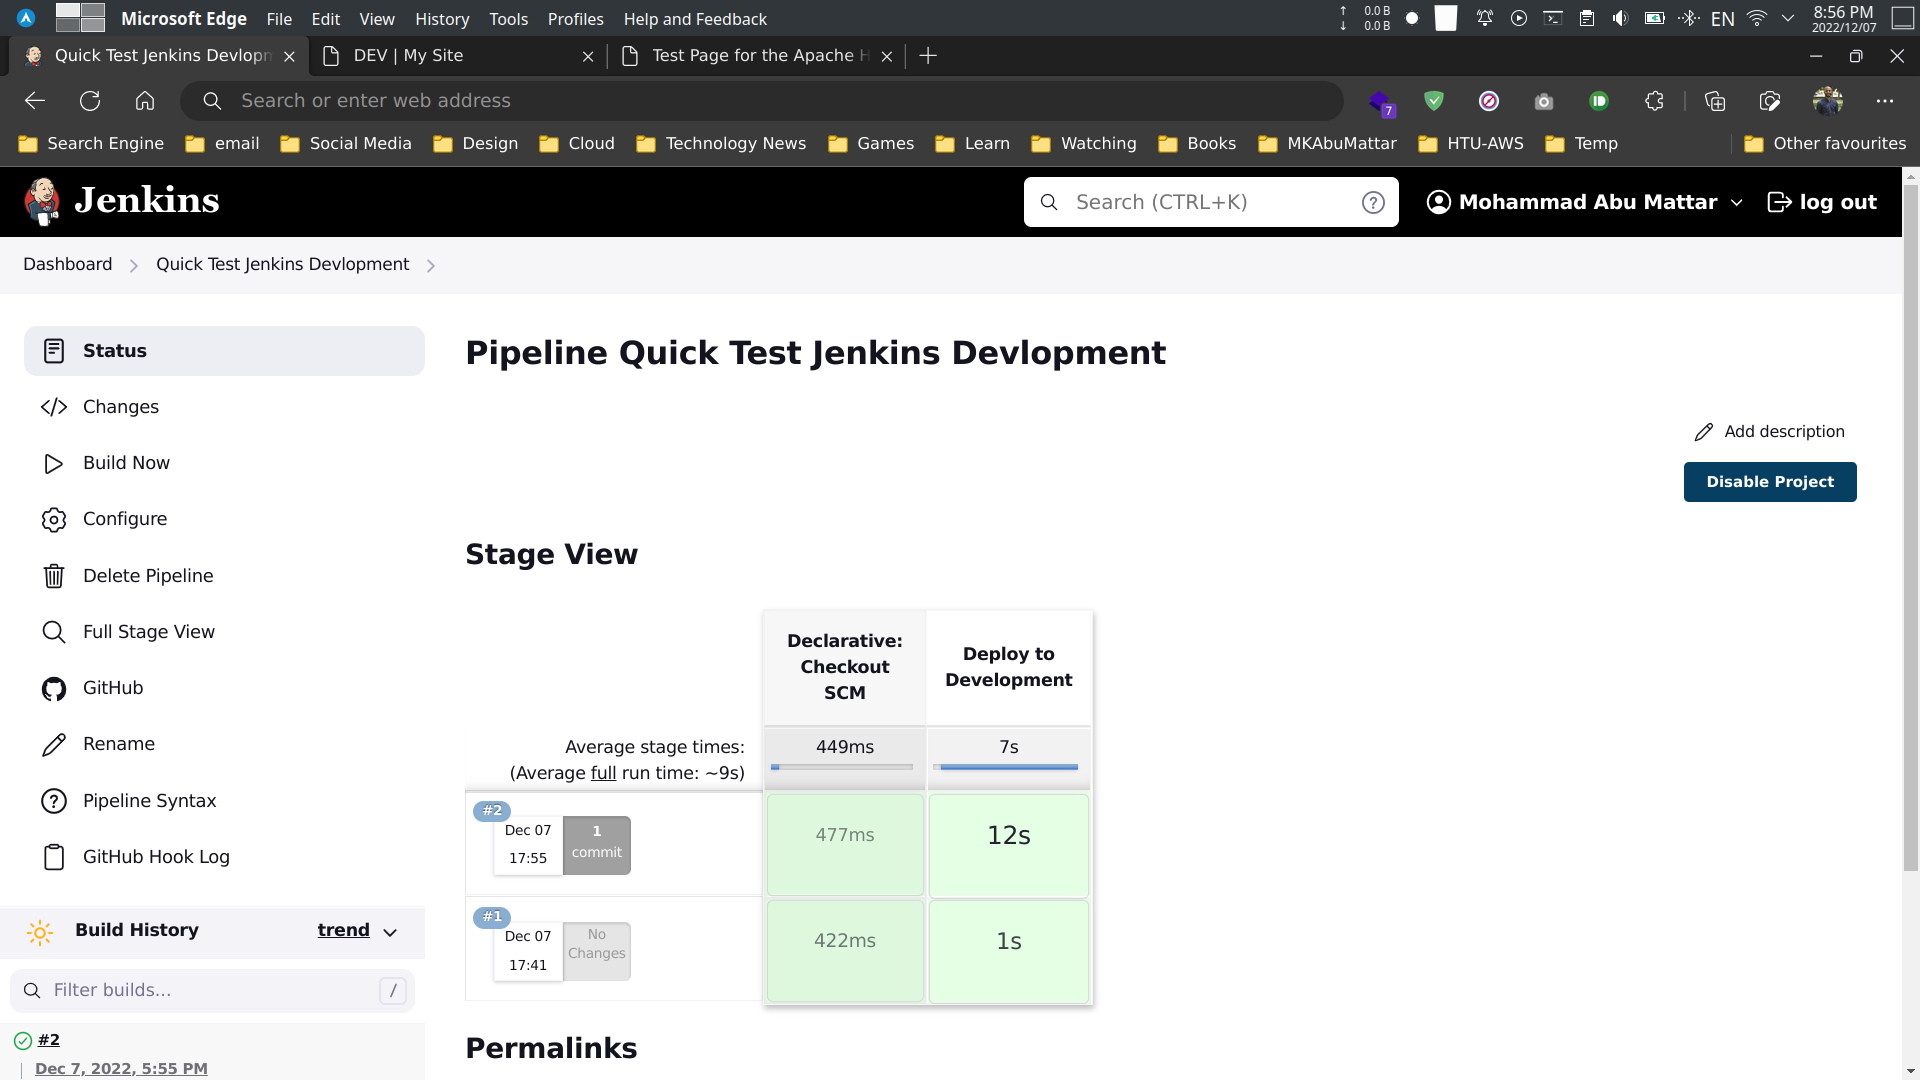
- Click on
Build #2to see the build details.

- Open the EC2 instance in the browser to see the changes.
Step 5: We’ll do the Same Changes for Jenkinsfile file
# create a new directorymkdir -p .build
# create a new directory for development and productionmkdir -p .build/dev .build/prod
# move the Jenkinsfile file to the development directorymv Jenkinsfile .build/dev
# create a new Jenkinsfile file for productiontouch .build/prod/Jenkinsfilepipeline { agent any environment { AWS_PUBLIC_IP_PROD = '' }
stages { stage('Deploy to Production') { steps { sh ''' # remove the files ssh -i "/var/lib/jenkins/.ssh/aws-key-pair.pem" -o StrictHostKeyChecking=no ec2-user@${AWS_PUBLIC_IP_PROD} "sudo rm -rf /var/www/html/*" # copy the files to the prod server scp -i "/var/lib/jenkins/.ssh/aws-key-pair.pem" -o StrictHostKeyChecking=no -r ./* ec2-user@${AWS_PUBLIC_IP_PROD}:/var/www/html # restart the apache server ssh -i "/var/lib/jenkins/.ssh/aws-key-pair.pem" -o StrictHostKeyChecking=no ec2-user@${AWS_PUBLIC_IP_PROD} "sudo systemctl restart httpd" ''' } } }}Step 6: Do Some Changes at Jenkins Configure for Development Jenkins Job
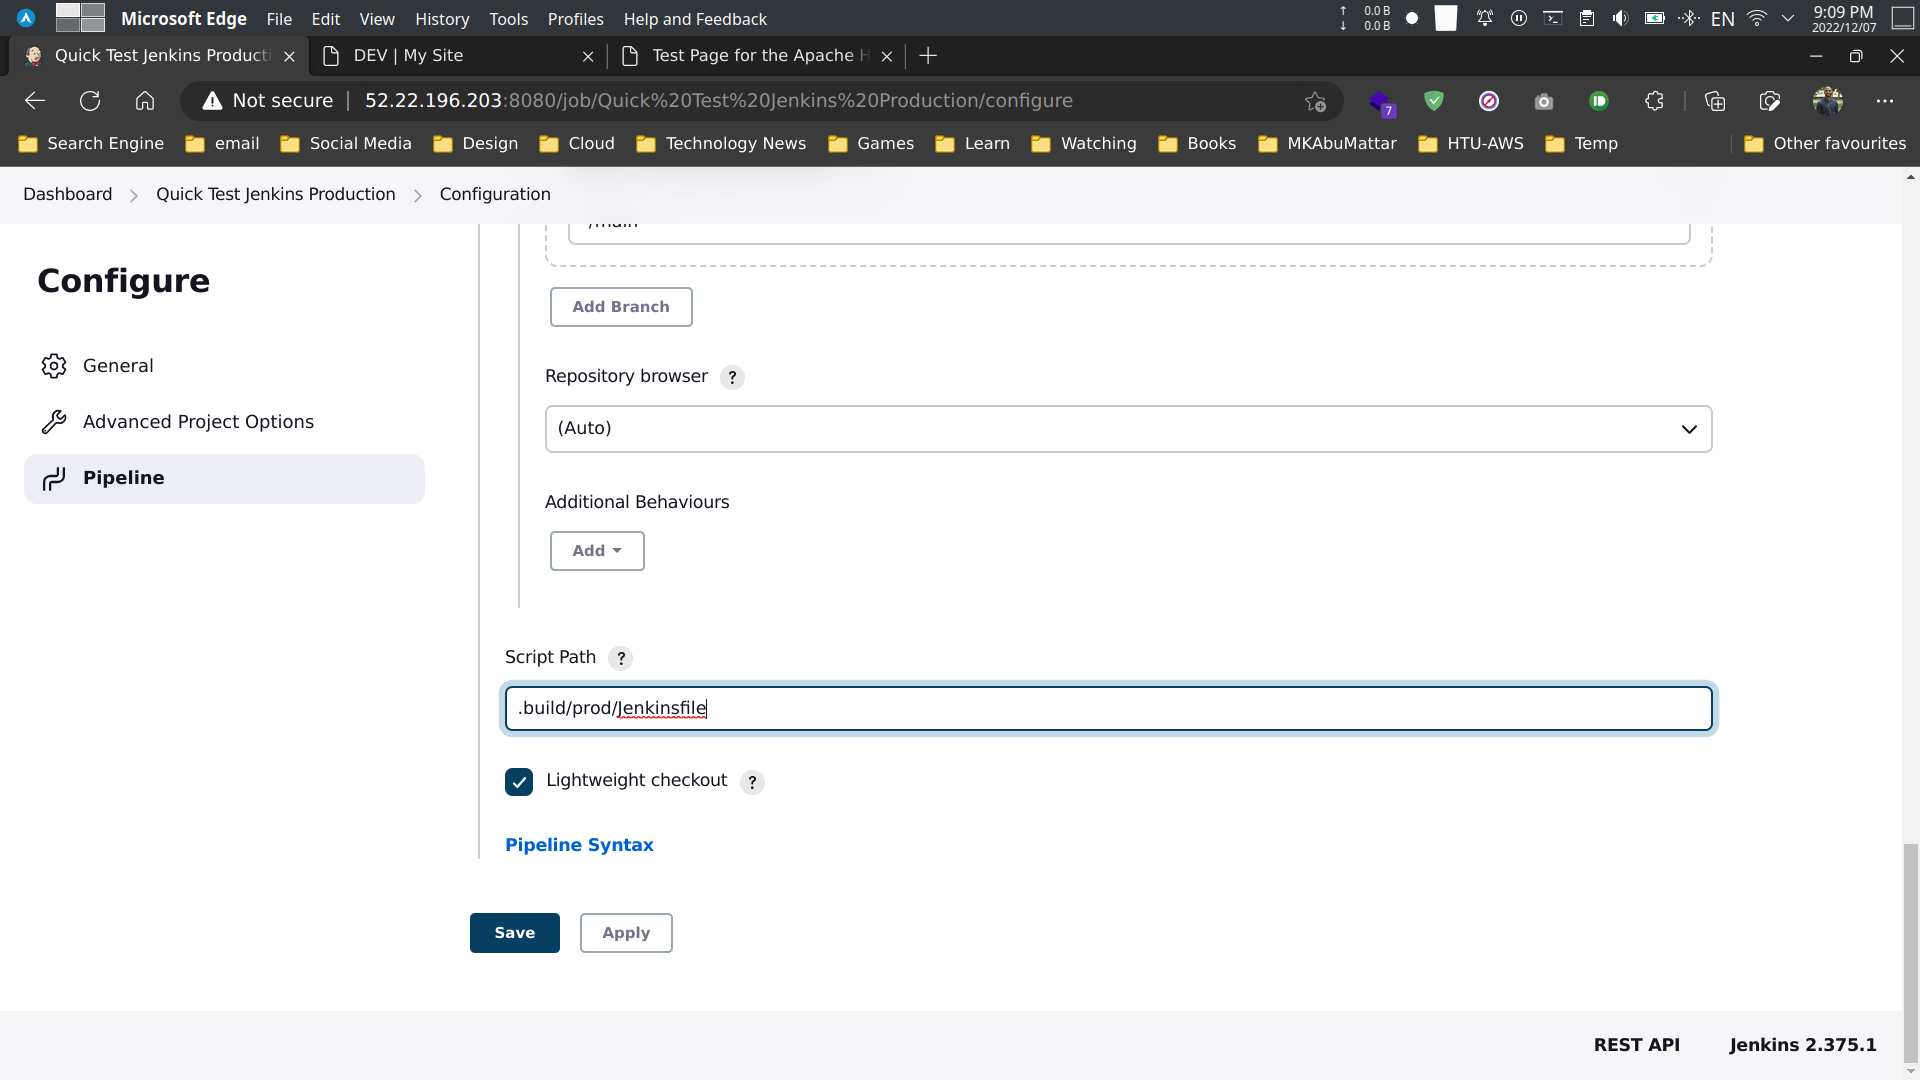
- Go to
Jenkins>Quick Test Jenkins Devlopmentjob >Configure. - Scroll down to
Script Pathand change the value toJenkinsfileto.build/dev/Jenkinsfile.

Step 7: Setup the Production Jenkins job
the Production Jenkins job will be triggered automatically when the Development Jenkins job is successful merge to the main branch.

- Click on
New Itemand enter the name of the job. SelectPipelineand click onOK.
- Name:
Quick Test Jenkins Production - Select:
Pipeline - Click on:
OK

- Configure the job.
- Description:
Quick Test Jenkins Production - Select:
Poll SCM- Schedule:
H/5 * * * * - Select:
Ignore post-commit hooks
- Schedule:
- Select:
Pipeline- Definition:
Pipeline script from SCM - SCM:
Git- Repository URL:
https://github.com/MKAbuMattar/quick-test-jenkins.git - Credentials:
Add>Jenkins>Global credentials (unrestricted)>Add Credentials>Username with password>Kind: Username with password>Username: <your-github-username>>Password: <your-github-password>>ID: <your-github-username>>Description: <your-github-username>>OK>OK>OK - Branches to build:
*/main
- Repository URL:
- Definition:
- Click on:
Save
Step 8: Go to GitHub and Merge the devlopment branch to the main branch
- Go to
GitHub>quick-test-jenkinsrepository >devlopmentbranch >Pull requests>New pull request.

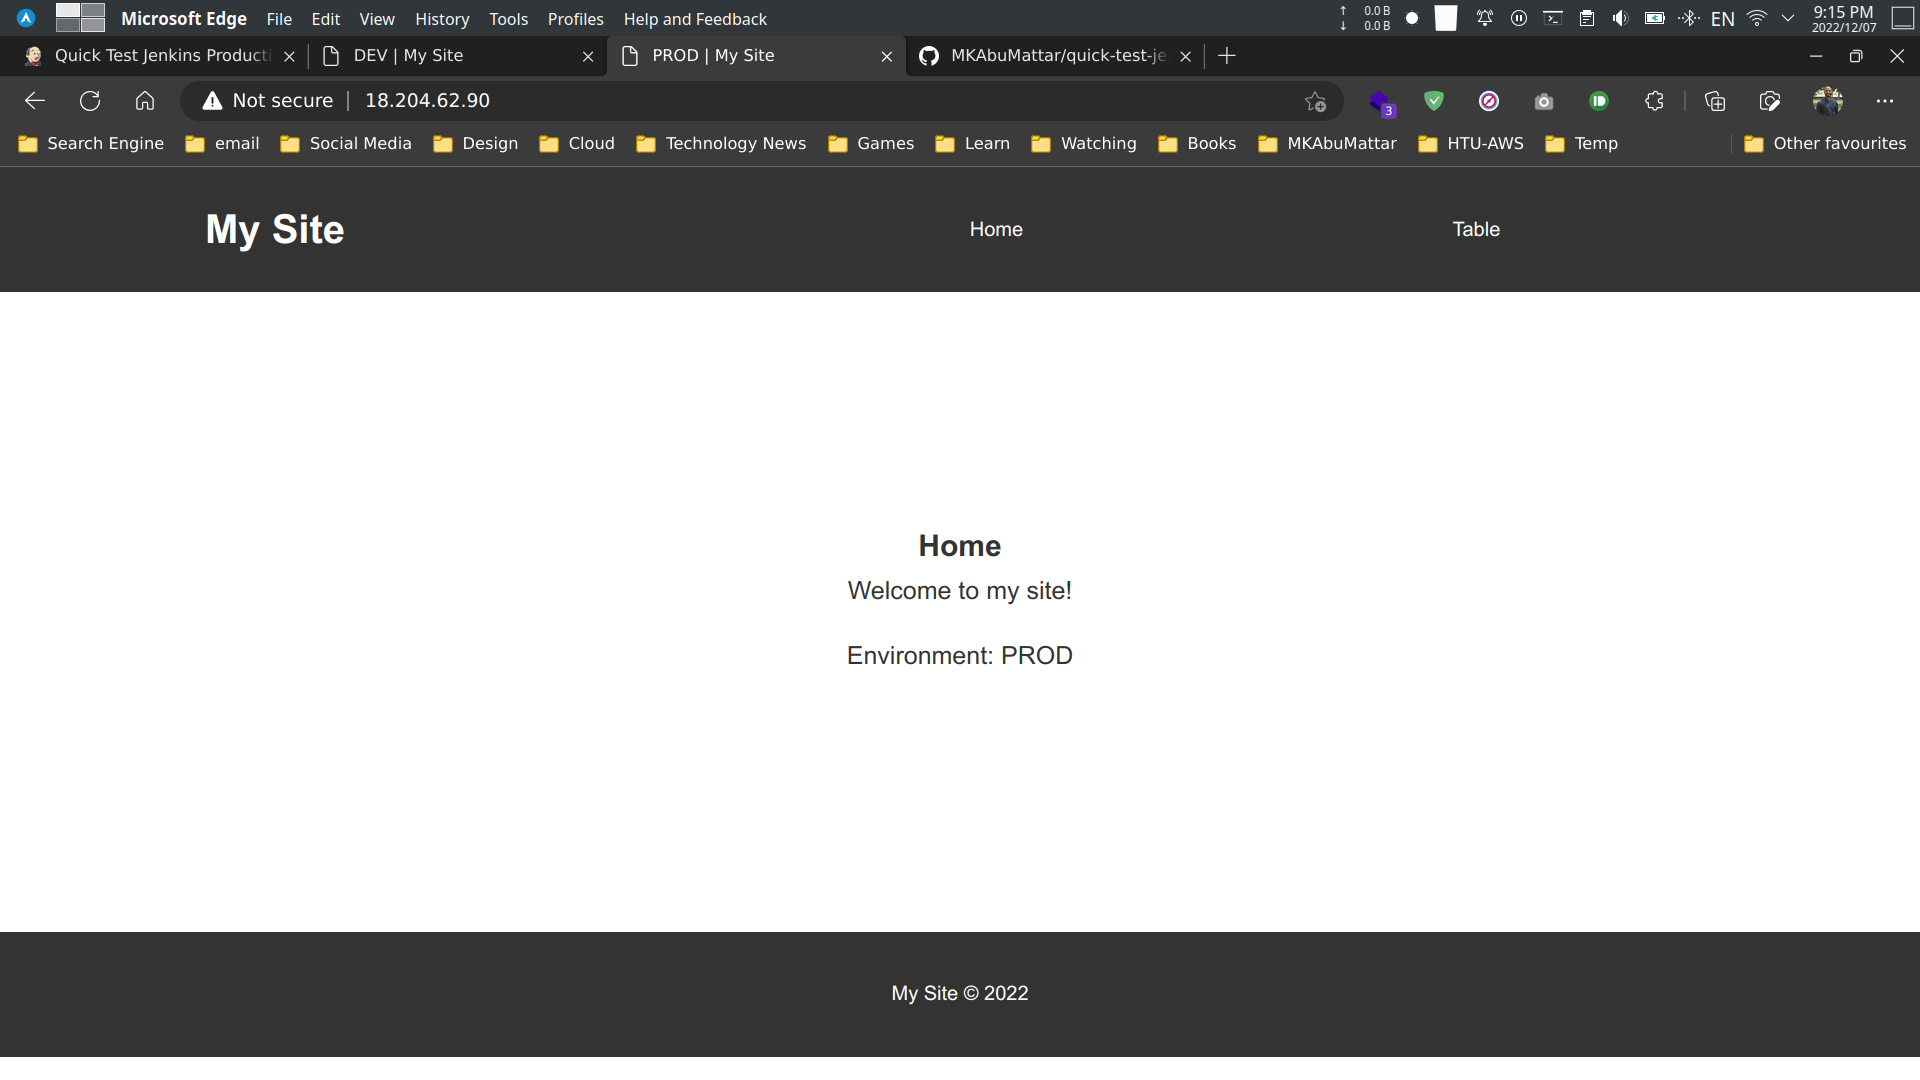
Check the EC2 instance in the browser to see the changes, and you’ll see the changes.

Conclusion
In this tutorial, we learned how to setup a CI/CD pipeline using Jenkins and GitHub. We also learned how to setup a Jenkins job to automatically deploy the code to the AWS EC2 instance.
References
- Jenkins User Documentation
- Jenkins Pipeline Syntax
- GitHub Docs - Webhooks
- AWS Command Line Interface (CLI) User Guide
- Amazon EC2 User Guide for Linux Instances
- Amazon VPC User Guide
- AWS Identity and Access Management (IAM) User Guide
- PHP Manual
- Getting started with Jenkins Pipeline
- Managing Jenkins Credentials
- AWS EC2 Key Pairs
- User data and shell scripts for EC2 instances
- Install Jenkins on AWS EC2 Instance (Previous related post)
- Git Handbook
- Continuous Integration with Jenkins - Jenkins Documentation